| The advantage of this "bathroom"
is that it confines the kitty litter that gets kicked out, and "wipes their
feet" as they exit the bathroom. It also gives the cats plenty of headroom
(our bigger cats hated the covered litterboxes). Please note that I exaggerated
the price, effort, and space used in "The Cats are NOT Pampered!".
This example is for a 3-litterbox bathroom, with a width of 48", height of 24", and depth of 24". The 24" height gives the cats plenty of headroom; the depth of 24" puts the litterboxes well back into the box to minimize litter tracking. The 48" width allows three litterboxes to be placed side-by-side comfortably. We used 5/8" thick pieces, but slightly thinner would be fine as well. Parts list: |
 STEPS
1 THROUGH 3 STEPS
1 THROUGH 3
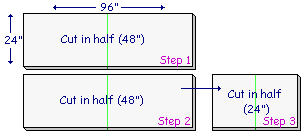
Go to your local lumber store to purchase white melamine-covered particle board shelves of the needed size. This example starts out with two 96" long boards, but four 48" long boards would work just as well and require only one cut. We chose melamine-covered because it is easily cleaned and looks sanitary. However, regular pine or particle board would work fine and cost less, though you would want to paint the finished room as a final step so it isn't porous. Ask the clerk to cut two 96" boards in half; set aside three of the pieces. Then have him cut the fourth piece in half again. The six pieces will (hopefully) fit in the back seat or trunk of your car. Don't forget to pick up a box of particle-board screws (you'll need 12-18, depending on how sturdy you want it to be). |
 STEP
4 STEP
4
On a flat surface, pre-drill the holes in the back piece - be sure to drill the holes close to the edge. Then, insert a screw into each hole and attach the sides to the back (it really helps if there are two people doing this step). |
 STEP
5 STEP
5
When you have attached the back to the sides, position the top piece and pre-drill the holes, then attach the top. Position the front edge of the top with the front of the sides; the top will probably extend slightly past the edges. Then, turn the piece over and attach the bottom. You have now built, all by yourself, a bathroom for your cats. We put rubber feet on the bottom of the box to make sure it wouldn't scratch the floor. And I covered the rough edges with 1" iron-on edges to give it a more finished look. |
 STEP
6 STEP
6
The next step is to position the bathroom in its final resting place and to add the rug. The rug is not attached to anything, so in the future you can vacuum it or remove it and hose it off or whatever. |
 STEP
7 STEP
7
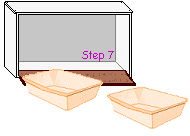
Now, fill the litterboxes with kitty litter and slide them into the bathroom. |
 STEP
8 STEP
8
I observed that the two big male cats perch on the edges of the litterbox, and it's not uncommon for an individual litterbox to be tipped over and the contents spilled out. So, we've added a new modification - the cats' bathroom is now a "3-holer outhouse". Cut a board 1½" shorter than the length of the box, then cut out 3 holes in the "shelf". You'll really want to seal the edges of these holes, for obvious reasons. Attach two brackets to the inside, and slide the shelf onto the brackets. Voila. |