How to install a safety cable in the base tube of a glider (with pix).
Some minor editing has been done, for clarity. Please hit the Reload or Refresh button on your browser, to see the latest version.
Every hang glider should have a safety cable installed in the basetube. If the basetube were to fail somehow, this cable would safely assume the flying loads, preventing a complete structural failure of the glider in mid-air. I believe this option is very necessary for all hang gliders, but the need becomes critical if you have a speedbar basetube, and VITAL if you use wheels. The bends of any speedbar may weaken the metal, to some degree. Wheels put repeated bending stress on a basetube, and this damage is only concealed, not repaired, if a basetube is bent by wheel loads, then straightened. If you buy a used glider, you may have no way of knowing if the basetube was previously bent by wheels, then straightened. The best fix is a new replacement basetube, in such a case, but a safety cable will be just as good. A safety cable in the basetube will add peace of mind to the flying of any glider, regardless of any previous history for the glider. In the past, please believe me, damaged basetubes have failed in flight. No pilot can hold the basetube together, if this happens. If any basetube failure occurs below a safe parachute deployment altitude, this issue can be extremely dangerous, as in life-theatening. Here is a cheap and easy way to defuse this possibility.
I prefer any aircraft cables to be made with two NICO sleeves, at each end. I know, some people think one NICO is just fine, and I do not agree. I do *not* believe that a single NICO could possibly slip, causing a cable failure, and I do not know anybody in hang gliding manufacturing who does believe that. What I do know, by direct observation of actual testing (to destruction) of new cables, is this: A cable made with two NICO sleeves at each end will almost always break somewhere in mid-span of the cable, at the full rated load-limit of the cable. A cable made with a single NICO sleeve at each end will almost always break where the cable exits the single NICO. A single NICO cable end is a weak spot. I would hope that this observation ends any discussions that are based upon faith or opinions. If you are not convinced, I seriously urge you to make your own tests. I can put you in contact with the shop where these ultimate tests were done. If knowing the results of these test now makes me a fanatic on this topic, I guess I can live (and longer, maybe) with that label. If you choose not to make your own tests, or choose to disregard what I have seen, then make your safety cable with single NICO cable ends. *Any* safety cable in the basetube is better than no safety cable.
In making the safety cable, a cable thimble (at each end) is not needed to protect the cable itself, because the basetube bolts have the same radius as the thimble, and the cable (as installed here) will never touch the basetube bolts, unless the basetube fails. If you do choose to use a thimble, that's even better, certainly, and then you want to use the thimbles for the "next size larger" cable. The larger thimble has a larger opening, so the bolt will more easily pass through the cable end.
For my installation, I am using the same bolts that fasten the basetube into the control bar corner brackets. If this is not an option with your hardware, consult with the HG manufacturer concerning the best way to bolt in a safety cable. I realize that there are some hang gliders made which have *no* good option for installing a safety cable. I can not address that issue here, but maybe the manufacturer still needs to hear a clamor from the cash customers, for having a safety cable. Especially with carbon fiber basetubes, the only real option may be for the manufacturer to install the safety cable during the manufacturing process. In such a case, the manufacturer could certainly offer "upgraded" CF basetubes (with a safety cable) as replacements, but it will not happen until the manufacturer hears a growing demand for this item, from the owners of their gliders. This easy-to-do construction article is meant for pilots with round basetubes, who do not yet have a safety cable installed.
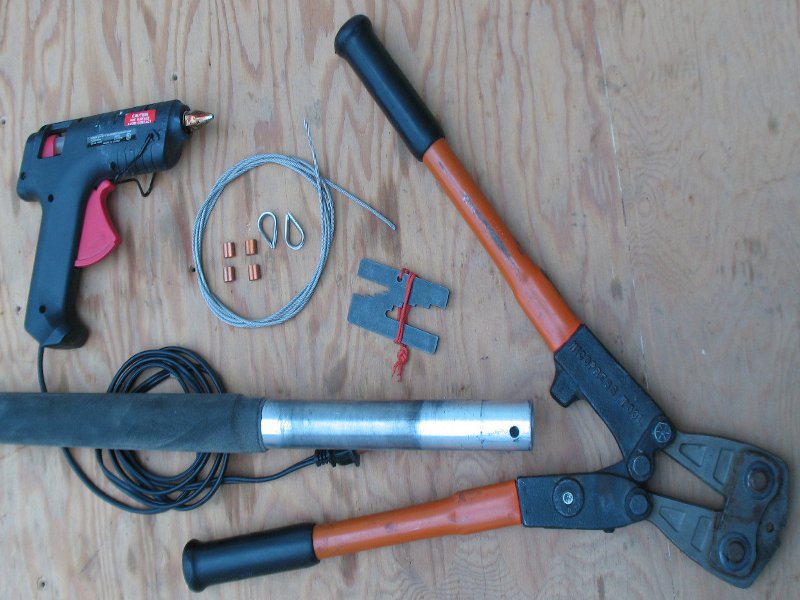
What you will need: Basetube, standard 3/32 inch flying wire as long as the basetube plus one foot (~30cm) more, NICOpress sleeves (2 or 4), 2 thimbles for 1/8 inch cable (optional), NICOpress tool (crimper), GO gauge, ruler (optional, used for two-NICO cable ends), cable cutters, and metal glue (twenty-minute epoxy or hot glue gun). The N-shaped metal plate is the GO gauge, which measures the crimped NICO sleeves after the cable is assembled, to insure that the NICO sleeves are fully crimped. A cheap NICO swaging tool is the Lehigh Group Swaging Tool ST18. You can often find deals on the high-dollar versions on eBay. Last time I looked, the Lehigh swaging tool cost about US$20 at Home Depot, in the USA. Felco cable cutters are the best, but pricey. Heavy tin-snips work almost as well for cutting cables, and may be easier to find.
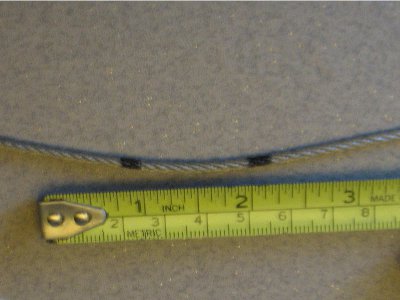
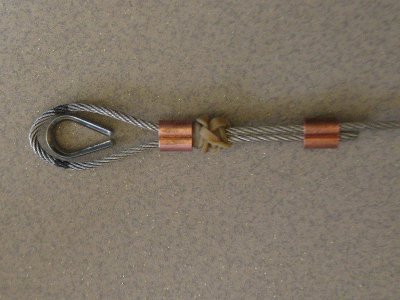
Construct one cable end normally, with a thimble, or else leave the loop larger than the control-bar bolt. I use two NICO sleeves at each end of a cable, with 1.5 inches (~38mm) of cable showing between the NICO sleeves. If you are using coated cable, you will need to strip off enough of the plastic coating to make these ends, at each end of the cable.
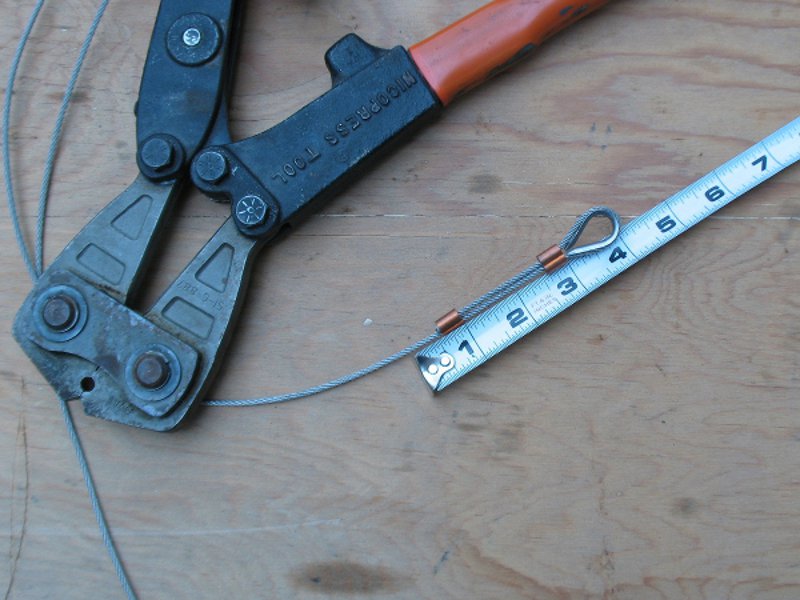
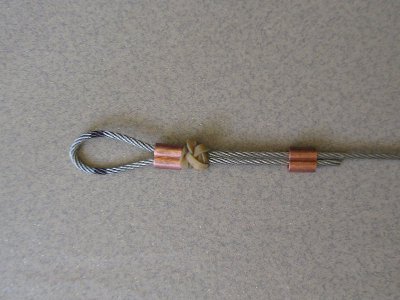
Put a bolt in the hole at one end of the basetube, and set the cable end over the bolt. You can use a rubber (elastic) band to secure the cable end in the right position, as shown below. Construct the other end of the cable in the same manner, but make the cable long enough to allow each end of the cable to fit over the bolt, as shown. You want less than 1/8 inch (3mm) of excess cable length at each end of the cable, so each end of the cable on the bolt will look just like the picture below, at the same time.
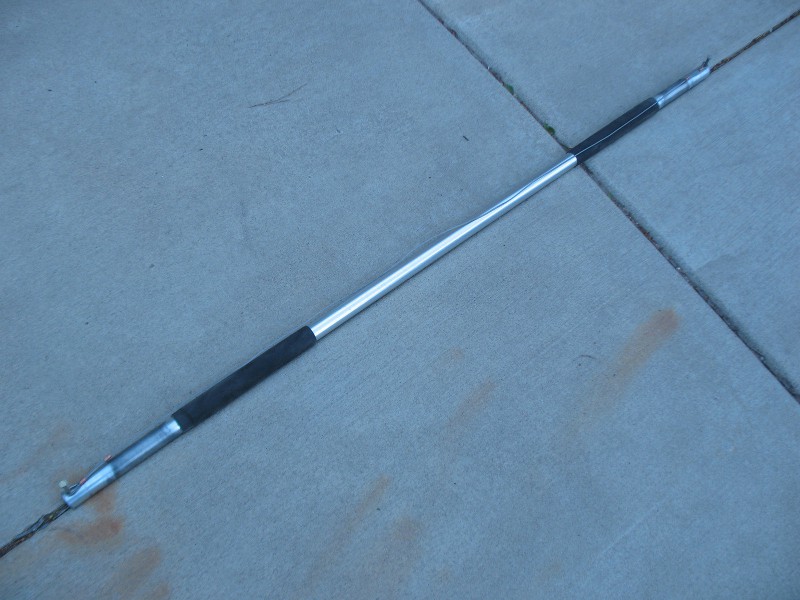
Shown full length below, there is only a small amount of slack in the base tube safety cable, before it is installed inside the basetube. At this time, separate the cable from the basetube bolts, and use the GO gauge to verify that each NICO sleeve is crimped to the correct dimension.
http://www.hanggliding.org/wiki/Checking_NICO_sleeves_on_cables
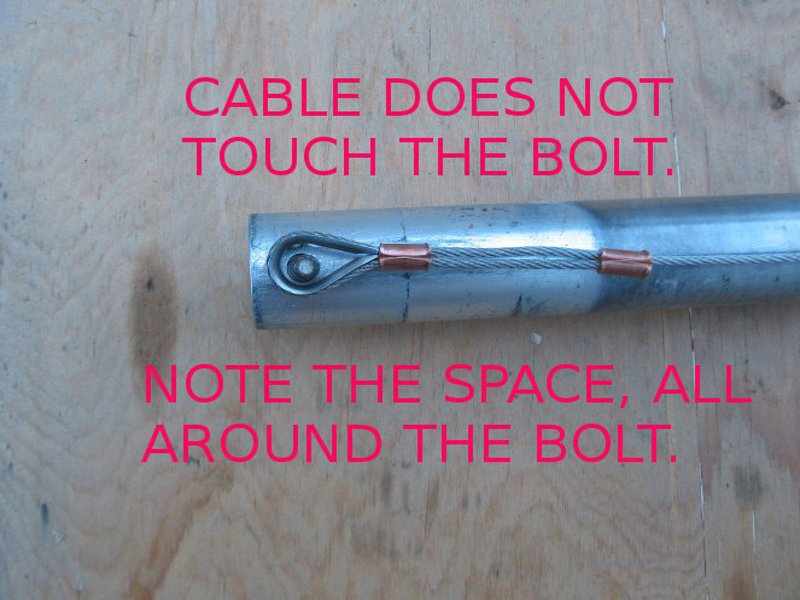
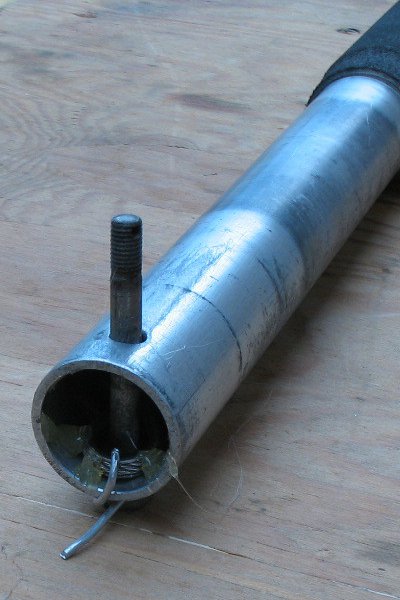
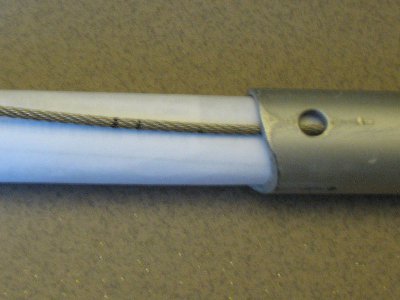
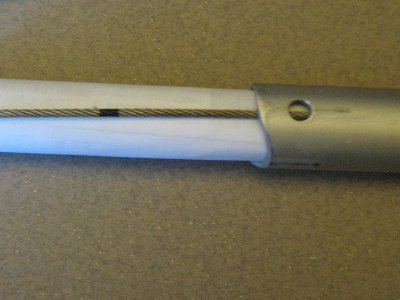
When the cable is installed in the basetube, the open loop should lie next to the inside of the tube, encircling the bolt, without touching the bolt. Here, I am using a small scrap of wire to hold the cable in the correct location. Use two or three dots of glue to hold the cable loop in place, and wait until the glue sets completely.
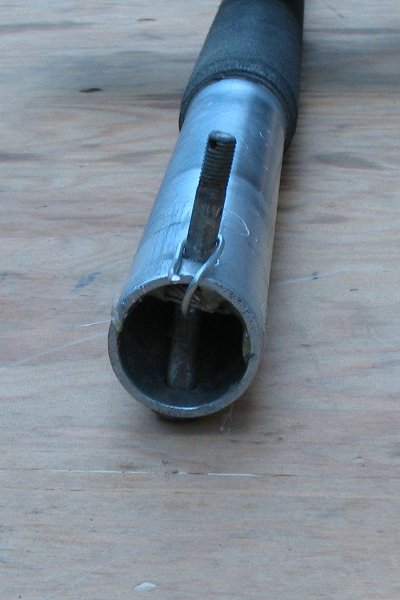
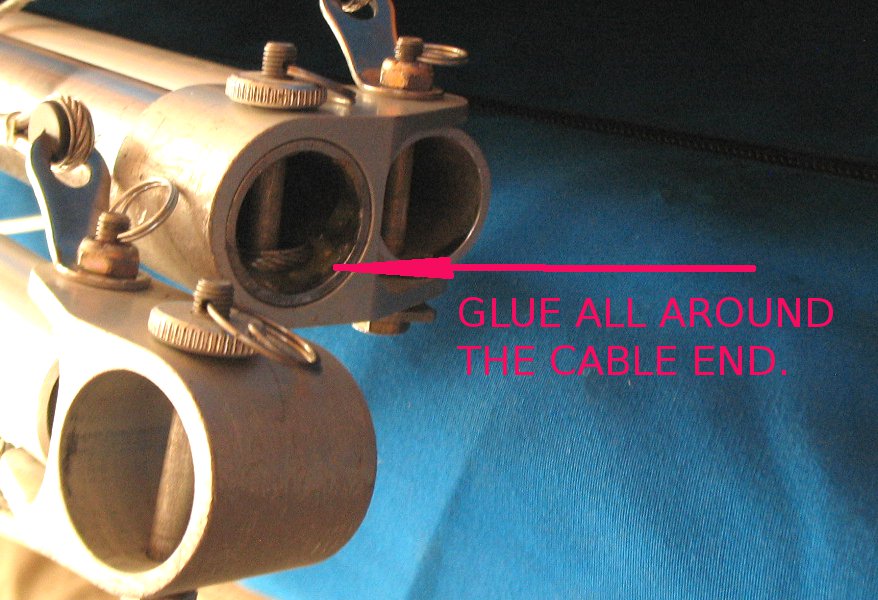
When the cable is secured in the correct location, temporarily remove the bolt from the basetube end. This removal will prevent the bolt from being glued in, with the cable. Cover all around the cable loop with glue, outside the loop. This extra glue will secure the cable loop firmly to the inside of the basetube, as seen below. The basetube can now be installed into the downtube fittings, with the original hardware, as usual. There will be no apparent difference in the glider or basetube, when the work is complete. You can inspect the inside ends of the basetube, to verify the position of the safety cable around each corner bolt, as it should be, when the glider is being assembled for flight. Personally, I enjoy the added sense of security, in having a structural cable back-up for the basetube. I doubt that the basetube would ever fail, in flight, but now I have no need to worry about that.
How to strip coated steel cable:
You can strip flying wires with a hot soldering iron, if you do it outdoors. The gasses released would not merely stink up the building, they are often VERY toxic. The secrets here are to use a very hot iron (give it a good five minutes to heat up), and keep the travel rate on the cable slow and constant, about two yards (2m) per minute. If the hot iron touches the cable, increase the travel speed of the iron. Then set the soldering iron aside, grab the coating (not the cable) with one pair of pliers, then twist the pliers and squeeze out the cable. Once the end of the cable is exposed, grab that end in another pair of pliers, and separate the pliers, to peel the coating from the cable. Trim away the ragged end of the cable coating, to be neat (nail clippers work well, for this part).
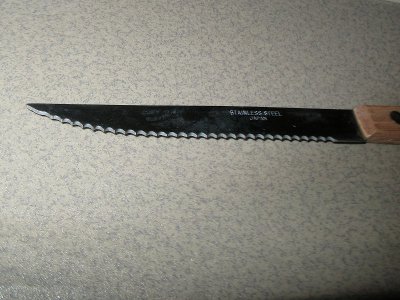
Another way to strip the cable coating (the indoor method) is to use a very cheap stainless steel serrated knife. These cheap blades have only one cut to make the blade sharp, usually at about a forty-five degree angle.
Put the cutting edge of the knife on the side of a fork at a forty-five degree angle, and rock the blade +/- ten degrees, and you will feel where the angle-cut fits against the side of the fork. When used to strip cable, the cutting edge of the blade does NOT touch the cable. Only the top of the sharpening cut, next to the flat part of the blade, touches the cable, so the cable is not damaged. The blade is held at an angle which will only cut the coating.

To strip cable with the knife, hold the blade at the angle which does not allow the sharp edge to touch the cable, and trap the cable inside one knife serration, against the workbench. Hold the knife steady, and pull the cable under the knife, to strip away a slice of the coating. Grab the coating only (not the cable) with pliers, and squeeze and twist the coating, to separate the coating from the cable. Grab the cable itself with another pair of pliers, and separate these two pliers to remove the coating from the cable.
How to make a Safety Cable, to fit a Speedbar:
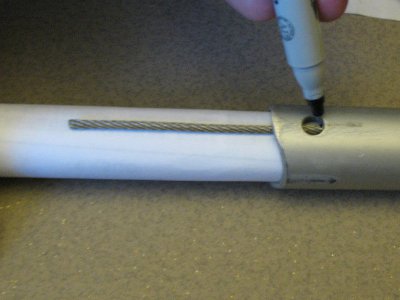
Make one end of the Safety Cable with one or two NICO sleeve(s) (and maybe a thimble), leaving the cable long enough to pass entirely through the Speedbar, with about a foot (25cm) extra, in length. Install the cable into the Speedbar, with a bolt through the Speedbar and the finished cable end. At the other end of the Speedbar, pull out any slack in the cable that was inside the Speedbar. Hold the cable against the hole in the Speedbar (here I am using a rolled sheet of paper, but a finger does the job as well). Mark the cable at each side of that hole, left and right, with a sharp-pointed dye pen (Magic Marker).
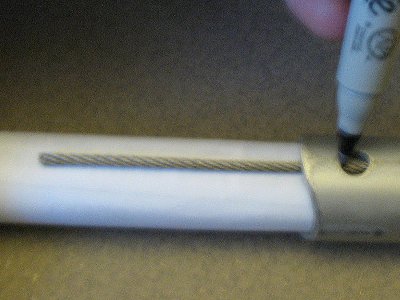
Remove the bolt at the far end of the Speedbar, and pull the cable out a bit. Fill in between these two marks, using the dye pen:
Now make a new mark, one inch (~3cm) farther away from the center of the cable:
Slide one or two NICO sleeves onto the bare cable, and thread the free end of the cable into the NICO(s) to form an end-loop, with the two marks on opposite sides of the loop. Don't grab the crimping tool, just yet. Wrap a rubber (elastic) band around and around and around the doubled cable, until the rubber (elastic) band is too small for one more wrap, to hold the NICO in place. Slide the rubber (elastic) band and the NICO toward the cable end, to form the end loop to the correct size. Make smaller adjustments, by pulling or pushing one or the other cable through the rubber (elastic) band and the NICO:
Add a cable thimble, if desired. Move the rubber (elastic) band and the NICO sleeve toward the end of the cable loop, making the loop the correct size. The rubber (elastic) band will hold the NICO in place, against the thimble:

Test-fit this cable length, when it is installed into the Speedbar. Remove the cable from the Speedbar, and make any adjustments in the cable length by pushing or pulling the cable through the rubber (elastic) band as needed, until the cable end loop is located correctly, meaning that the cable is the correct length. You may need several test-fittings to get the cable length correct. I recommend about 3/16" (~3mm) of free space (slack) at each end of the Safety Cable, from the bolts. When the cable end loop is set to the correct length, remove the cable from the basetube one last time and crimp the NICO sleeve (closest to the end-loop) in place normally. The rubber (elastic) band has no further use, and it can be removed from the cable. If you are using two NICOs, leave 1.5" (~38mm) of bare cable exposed between the two NICOs. With the second NICO in the correct position, mark the cable end at the second NICO and cut off any excess cable. Crimp the second NICO in place. If you are using one-NICO cable ends, leave a finger-length of cable coming out of the NICO, and cut off the excess cable. You can wrap tape around this cable end, and the cable body, to be neat. Use the GO-gauge to check every NICO for the correct crimping dimension, then install the Safety Cable into the Speedbar with glue at the end-loops, as described earlier.
Fly high, fly far . . .
Red