SAIL STITCHING REPAIR
You can do this job with a flame, or with a hot soldering iron. For a flame, use a common butane lighter (not one of the "blowtorch" types), pointed downward. Never put any flame under any sailcloth.
Lay the sail out so the bad stitches are pointing skyward. Pull up the last bad stitch, so the thread points upward. Cut the thread off about 3/16" (5mm) from the sail, using nail clippers or sharp scissors.
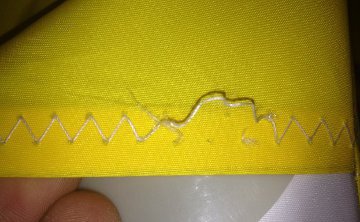
(Photo credits to Jatay on Hanggliding.org)
If you use a soldering iron, get the iron hot, far away from the sail. Bring the iron to the glider, melt the stubby thread down almost flush with the sail, and pat the melted thread flat with a butter-knife. Immediately, get the hot iron far away from the sail. If you put the hot iron down anywhere near the sail, just expect a disaster.
If you use a butane lighter, start the flame and point the flame down at the stubby thread. Slowly melt the thread down almost flush with the sail, and pat the melted thread down flat with a butter-knife. Use less flame than you think you need. Just melt the thread, do not let the thread burn and turn black. Immediately, put the lighter far away from the sail, because it is still hot.
You can replace the blown stitching with UV-proof carpet-sewing thread or upholstery thread. These types of thread are far too strong to be broken with your bare hands; they would cut your skin if you tried break this thread bare-handed. Use an ordinary sewing needle. Regular commercial fabric shops carry this thread (we use white here, to match the existing stitches).
Start a few stitches back, where the sail stitching is good, and sew in and out through the original stitch holes. Sew each stitch, which was missing, and continue for a few stitches into the good stitches. Your first pass of sewing should look like this:
/ / / / / / / / / / / / / / / / / / / / / / /
Your second pass of sewing should look like this:
\ \ \ \ \ \ \ \ \ \ \ \ \ \ \ \ \ \ \ \ \ \ \
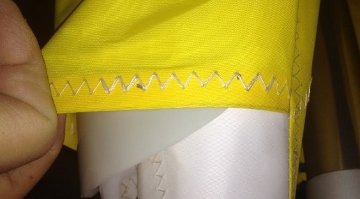
So, after these two passes with the new thread, the finished job will look just like the original stitches:
/\/\/\/\/\/\/\/\/\/\/\/\/\/\/\/\/
Cut and melt down the four new thread ends, as above. Your repair is now better than new, and it would take sharp eyes to spot it.
Fly high, fly far . . .
Red