


Installing DirectX
DirectX is a system component for Microsoft Windows that provides a rich multimedia API for applications. Because DirectX is a system component, it must be installed via a Microsoft supplied setup engine. End users can run a setup program supplied by Microsoft that is made available through the DirectX SDK. It is common for a copy of this setup program to be made available on the CD-ROM distribution of a multimedia application.
This article describes an alternative web-based installer for updating the DirectX runtime components that is integrated with the Windows Installer package for your application. It consists of a small piece of code that can be included in your Windows Installer package that will check for required updates to the DirectX runtime and download only the necessary updates from the internet at install time.
The method described here can be implemented entirely with Visual Studio .NET 2003 and does not require an expensive installation authoring tool. However, the method can still be used with other installation authoring environments and is not dependent upon Visual Studio .NET specifically.
The source code described in this article can be downloaded with the sample code for my book "The Direct3D Graphics Pipeline". This article is meant to be read while consulting the source code at the same time. The details of the code are not discussed here, but the general structure of the important points are covered and how to recreate them in Visual Studio.
The relevant code consists of a custom action DLL project, a setup
deployment project and a JScript custom build step file. After installing
the sample code package, the source code to the custom action DLL is in
the dx9\C++\rt_Setup folder and the source code to the setup
deployment project (and its custom action definition) is located in the
Direct3DGraphicsPipeline folder. The build script is located
in the Direct3DGraphicsPipeline\SetupPostBuild folder.
All these folders are relative to the install location you chose when you
installed the package which defaults to "%ProgramFiles%\Pahvant
Technologies\Direct3D Graphics Pipeline". The solution file
Direct3DGraphicsPipeline.sln containing only the relevant
projects is in the deployment project folder.
Redistributable Package Files
A fully configured redistributable package for updating the DirectX runtime is approximately 55 MB in size. The package contains three groups of files:
DXSETUP.exe- An executable that provides an end-user UI and controls installation of the DirectX runtime components.
DSETUP.dllanddsetup32.dll- DLLs that provide an application with a method for controlling the installation of the DirectX runtime components.
*.CAB- File payloads for the DirectX runtime components.
In the latest DirectX SDK (August 2006 as of this writing), the DirectX redistributable license agreement requires that an application include at least the following files when it installs the DirectX runtime:
dsetup32.dllDSETUP.dllDXSETUP.exedxupdate.cabdxdllreg_x86.cab
This minimal set of files is approximately 3 MB in size. The CAB files make up the remaining 52 MB of the redistributable package. The redistributable license allows an application to include only those CAB files needed to update the runtime to the requirements of the application. The CAB files are roughly grouped as follows:
| Windows 98/98SE/ME support |
DirectX.cabBDA.cab |
| Broadcast Driver Architecture (DirectShow) support |
BDA.CABBDANT.CABBDAXP.CAB |
| Managed DirectX support |
*_MDX1_x86.cab*_MDX1_x86_Archive.cab |
| D3DX support |
*_d3dx9_*_x64.cab*_d3dx9_*_x86.cab |
| 64-bit native application support[1] |
*_x64.cab |
| DirectX core runtime support |
DirectX.cabdxnt.cab |
| XInput support |
*_xinput_x64.cab*_xinput_x86.cab |
| XACT audio system support |
*_XACT_x64.cab*_XACT_x86.cab |
[1] *_x64.cab works for both 32-bit and 64-bit
operating systems.
The Managed DirectX, D3DX, XInput and XACT components are provided as multiple versions, each designated by a year and month as part of the filename. An application should include the version of the components needed and can safely omit the other versions. Groups of CAB files relating to a feature that isn't used by the application can be dropped from the redistributable package for the application.
For example, suppose our application is a 32-bit application that
requires the April 2006 version of the D3DX library. We could omit
all *_x64.cab redistributable files and need only include
Apr2006_d3dx9_30_x86.cab for D3DX.
A Web Based Installer for DirectX
When an end-user updates DirectX from Microsoft, they download a
small executable that probes their system, determines the necessary
components that require update, downloads the corresponding CAB files
from a Microsoft web site and then performs the update. This has the
advantage that if a user has some of the components already installed,
only the components requiring update are downloaded from the internet.
If we used the full redistributable package and
DXSETUP.exe, the user would be required to download 55
MB, which would take approximately 5 hours over a 28.8 Kbps modem
connection.
We can create our own web-based installer for the DirectX
components needed by our application that functions similar to the one
provided by Microsoft. The web-based installer would query the target
machine for the version of DirectX components installed and download
the necessary files from a web site before using
DXSETUP.exe or the DirectSetup API to install the
components.
Visual Studio .NET 2003 and Windows Installer
Windows Installer is the installation technology provided by Microsoft since the first release of Windows 2000. All the data required for installing an application is stored in a database contained in the MSI file. Windows Installer organizes setup as a sequence of actions that modify the system, such as copying files, writing registry keys and so-on. A set of standard actions handle the most common needs of application setup and the author of an MSI package can create custom actions to perform installation related tasks not provided by the standard actions. The installation proceeds in two phases: an immediate phase where information is gathered from the user and from the system about what needs to be done during installation and a deferred phase that performs the actions that update the system in a transaction oriented manner. Should any of the deferred actions fail, the entire installation process is unwound as the transaction is rolled back. If all the deferred actions succeed, the installation transaction is committed to the system and the application is installed successfully.
Visual Studio .NET 2003 provides a deployment project type that creates a Windows Installer based setup for your application, packaged as an MSI file. Visual Studio provides a simplified design view of an MSI package. The deployment project type exposes a design time user interface for deploying files, registry items, file types, and COM objects. The user interface can be customized by inserting and removing dialogs from a fixed list and the installation sequence can be customized by inserting custom actions.
In this case, our deployment project contains all the files necessary to install the sample code and the corresponding shortcuts. We don't need any additional dialog boxes in this case; we will always install the necessary DirectX runtime components needed by our application. A corresponding install custom action will be inserted to perform the required update of the runtime.
Adding the Custom Action
A custom action can be in VBScript, JScript or an entry point in a DLL. (Visual Studio lets you write a restricted form of custom action in .NET by providing a DLL shim that loads the common language runtime and calls the methods on the Installer classes in your assembly.) Since the DirectSetup API is not exposed to script, we will write our custom action in C++ in a DLL project. The signature of a DLL custom action looks like this:
UINT __stdcall rt_setup_ca(MSIHANDLE session)
The session parameter is the mechanism that your code
uses to talk to Windows Installer. A deferred custom action can
only call a limited number of MSI API functions and can only obtain
the value of the CustomActionData property at runtime.
The return value indicates success with ERROR_SUCCESS or
failure with ERROR_INSTALL_FAILURE.
To add a custom action, first select the setup deployment project in the Solution Explorer. Then select View / Editor / Custom Actions to view the custom actions for the project. A tree view will be displayed showing four folders for Install, Commit, Rollback and Uninstall actions. These folders govern the conditions under which your deferred custom action will run. We want to create an action that will update the DirectX runtime when the product is installed, so our action is under the Install folder.
Windows Installer supports custom actions running from a DLL installed
with the product, or a DLL stored inside the Binary table
of the MSI file. In the latter case, Windows Installer will unpack the
DLL, call LoadLibrary and then GetProcAddress
to obtain a pointer to the custom action code.
Visual Studio provides the ability to author DLL custom actions
from files installed with the product, or from the Binary
table. For the former when you insert a custom action in the custom
action editor, Visual Studio prompts you for the file you want to run,
showing you a browsable folder view of the application files installed
on the target machine, shown below on the left. You simply browse to
the installed file that contains your custom action code and select that
as the source of the custom action.


(Click to enlarge)
You may notice that once you browse into a folder, such as the
application's installation folder, the add buttons become enabled.
If you click Add File... at this point, then you can browse to a file that
will be stored in the Binary table for your custom action.
Once the file has been added to the Binary table in this
way, it will appear in the browse dialog as shown above on the right.
The file rt_Setup.dll is in the Binary
table and is not installed into the application's installation folder.
It probably would have been better for the deployment project team at
Microsoft to expose the Binary table explicitly instead of
in this cumbersome manner, but at least we have the ability.

Once the custom action has been inserted, we need to customize the
design time properties for the action, as shown above. The properties for
our custom action consist of a descriptive name for the action in Visual
Studio, a condition that must evaluate to non-empty for our custom action
to run, the custom action data, the DLL entry point and whether or not
this custom action is a .NET custom action. The condition for our action
should evaluate to true when the checkbox on our dialog was checked.
Using the checkbox's property, INSTALL_RUNTIME, takes care of
the condition nicely. The custom action data for our application consists
of a Windows Installer formatted string. The square bracket notation
surrounds the names of properties that will be evaluated by Windows
Installer before the string is passed to our action. The custom action
data consists of three values separated by vertical bar (|)
characters:
[PROGRESS_WINDOW][DIRECTX_REDIST_URL][TempFolder][ProductCode].DirectX\
The first value will contain the window handle of our installation
progress dialog so that DirectSetup can create its progress dialog
as a modal child of our window. This keeps the DirectX progress on
top of our progress and prevents interaction with our dialog until the
DirectX component update is completed. The second value is the URL
where the DirectX redistributable files for our application are
located. Both of the first two values utilize custom public properties
that only have meaning in the installation of our application. The
third value uses the standard properties TempFolder and
ProductCode to construct a path in the system temporary
folder where we can stage the files needed to update the DirectX
runtime.
Implementing the Custom Action
The DirectSetup API provides a set of functions for querying the DirectX runtime version and installing system components from the CAB files. If the core runtime is updated, then a reboot of the machine will be required to finish the installation.
When Windows Installer invokes a DLL custom action, the DLL is
loaded in isolation. Any DLLs required by the custom action must
already be installed on the machine, or must be dynamically loaded by
the custom action itself. In our case, we require
DSETUP.dll and dsetup32.dll in order to
access the DirectSetup API.
The first thing our custom action will do is obtain its context
information that we set in Visual Studio by obtaining the value of the
CustomActionData property with
MsiGetProperty. From this property we'll get the path to
the temporary staging area that will contain the DirectSetup DLLs.
We can then use LoadLibrary to obtain the pointers
for the DirectSetup functions we will use:
DirectXSetupGetVersionDirectXSetupSetCallbackDirectXSetup
DirectXSetupGetVersion will tell us the version of the
core runtime so that we will know if it needs to be updated for our
application. If we have a dependency upon a particular version of the
D3DX, XInput or XACT DLLs, we can use LoadLibrary to
check for their presence. Similarly, code can be written to determine
if the .NET Framework is installed, if your code uses Managed
DirectX. In this case, the code checks the core runtime and for a
particular version of D3DX.
Once we know which parts of DirectX need updating, we can build a
list of CAB files that we will download from the internet using the
URLDownloadToFile function in urlmon.dll.
This function was first made available with Internet Explorer 3.0 and
is always available on our target machines.
Once all the necessary files have been downloaded, we can set a
callback routine and call the setup function to update the DirectX
runtime. The callback routine can be useful for detailed logging or
for using your own progress dialog instead of the default
DirectXSetup progress dialog.
Signalling a Required Reboot
If the DirectX core runtime is updated, a reboot will be required
to finish off the installation. Windows Installer provides a way
for a custom action to signal that a reboot is required at the end of
the installation with the MsiSetMode function. However,
this function only affects the state of the installation engine when
called in the immediate phase of processing. Visual Studio .NET 2003
only provides a way to author custom actions in the deferred phase, so
we'll have to find a way to define our immediate custom action outside
of the deployment project support in Visual Studio. First let's look
at what the immediate phase of our action should do.
A custom action can determine whether its being executed in the
immediate or deferred phase by calling MsiGetMode. We
can use this to have our single entry point handle both the work that
must be done in the immediate phase and the work done in the deferred
phase.
Since we need an immediate phase custom action anyway, this is a
good place to put some code that calls EnumWindows to get
the window handle of the progress dialog, since Windows Installer does
not expose this as a property. We can then set a property of our own,
PROGRESS_WINDOW, to contain the window handle of the progress
dialog to pass to DirectXSetup as the owner window of its
progress dialog.
Since an immediate phase custom action runs before any changes
have been made to the system, we don't have access to the files
DSETUP.dll or dsetup32.dll by installing them.
So, we have to stage these files somehow so that we can check the DirectX
version to know if a reboot is required. Windows Installer has a table
just for this purpose -- the Binary table. Our immediate
custom action streams the DLLs out of the Binary table
into the the staging area.
The DirectX setup API requires that the CAB files be in the same
location as the setup DLLs. The deferred phase of processing will reuse
the same DLLs that were unpacked by the immediate phase. Once the files
are unpacked, we can identify the version of the core runtime currently
installed and determine if we will need a reboot. The MSI install
engine is signalled of a needed reboot at the end of the installation
by calling MsiSetMode.
Patching the Built MSI
As it stands, our built MSI almost has everything we need, but it is missing three things:
- The
CustomActionrow defining our immediate custom action to signal the potential reboot. - The DirectSetup DLLs in the
Binarytable. - The value for the
DIRECTX_REDIST_URLproperty, used in the custom action data.
Since Visual Studio doesn't expose an authoring interface for an immediate custom action, how do we get this into our MSI file? We can use the Orca tool from the Windows Installer SDK (part of the Platform SDK) to examine the MSI file produced by Visual Studio to identify the necessary changes we need to make. We can then automate the changes using a JScript file and the Windows Installer automation interface. The script file is invoked by Visual Studio as a custom build step after the MSI is built. This provides an automated way, using Visual Studio, to enhance the MSI that it produces.
When Visual Studio creates keys for rows in the MSI database tables, it usually uses a string form of a GUID. This doesn't make for very readable keys, but it will guarantee that they are unique. For each custom action created in Visual Studio, two custom actions will be inserted into the database. The first is an immediate custom action that sets the custom action data property for the deferred custom action authored in Visual Studio. The second is the deferred custom action itself.
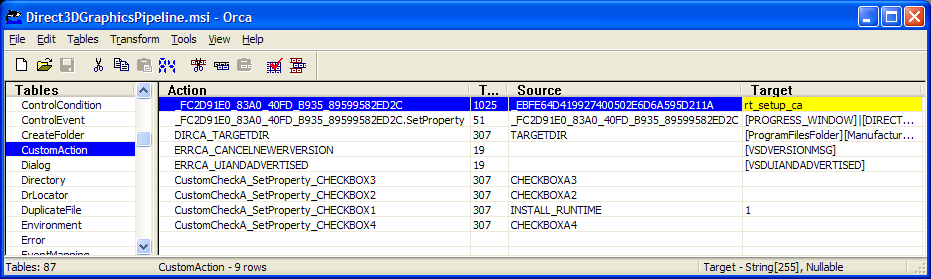
Below are two views of the CustomAction table in Orca.
The custom action corresponding to our DLL entry point is shown
highlighted on the left. The Type column determines
whether or not a custom action is immediate or deferred. If the 1024
bit is set, then the action is deferred. Beneath it you can see the
SetProperty action that sets the custom action data for
the deferred action.

(Click to enlarge)
Since we have a single entry point for both our immediate and
deferred custom actions, we can simply copy the existing definition
created by Visual Studio. To give it a unique primary key, we prepend
an additional underscore (_) to the Action
column. We strip the deferred bit from the Type column
and leave the target and source columns the same. The result is shown
on the right, with the new row highlighted.
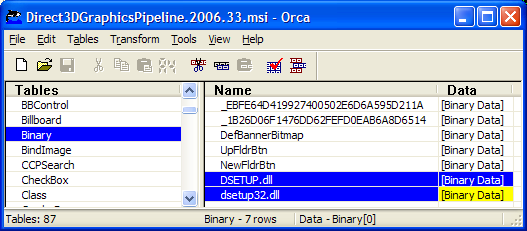
Next we need to stream our DirectSetup DLLs into the
Binary table. Visual Studio will have created rows,
again using string GUIDs as primary keys, for our custom action DLL
and the banner bitmap we applied to our dialogs. We'll use the
filename of the DLL as the primary keys for the new rows in the table.
The added rows are shown highlighted below in Orca.
(Click to enlarge)
Finally we need to add a row to the Property table to
set the URL of the location of the redistributable files
(DXSETUP.exe, DirectX.cab, etc.). The
primary key is the name of the property, so we just need to insert a
new row with the property name and its value. The new row is shown
below.

(Click to enlarge)
The JScript file in the sample code performs all of this with the
automation interface for Windows Installer. The automation interface
provides you with a simple scripting interface to the installation
database through the usual Database, View
and Record classes and a simplified form of SQL.
Because the automation model for Windows Installer is rich, we can do pretty much anything we want to the MSI after its been built by Visual Studio. In the sample code for the book, the script makes an additional change to support proper upgrading of a previous version of the source code to the current version. This change has no bearing on installing DirectX, but it was necessary to overcome a defect in Visual Studio's deployment projects.
Automating the Build
Visual C++ projects in Visual Studio have the richest build-time model, allowing you to attach arbitrary build commands to arbitrary files. The dependencies and outputs of each custom command can be recorded into the build system so that Visual Studio recognizes when your custom build steps need to be executed due to outdated dependencies.
Unfortunately deployment projects don't provide any sort of custom build step model in their project properties. However, this is easily worked around by adding a new, blank C++ project to the solution and using the custom build step logic inherent to C++ projects. After adding the project, delete any folders and files from the project. You can then create a script or batch file to perform whatever custom build steps you need and add the script to the C++ project. You can then use the custom build step logic in the C++ project to execute the script.

(Click to enlarge)
Shown above are the custom build step properties for the script we
created to patch the MSI built by Visual Studio's deployment project.
The $(InputPath) macro is used in the command-line to
invoke the script and other macros are used to locate its inputs and
dependent MSI path in the deployment project. The macros provided by
Visual Studio let you create code that isn't dependent upon a
particular directory on your machine. For sample code this is
particularly important, otherwise the code is unlikely to compile and
work properly on someone else's machine. When you edit a project
property that can contain macro values in Visual Studio, an ellipsis
(...) will take you to an editor that lists the available
macros and their current values.
Finally, select the Project / Project Dependencies... menu item to bring up the project dependency editor. Select the C++ project containing your script in the combobox and check the deployment project in the listbox to tell Visual Studio that the script project depends on the deployment project.
Customizing For Your Application
To use this code in your application, you will need to customize a few items:
- Change the download URL for the DirectX runtime redistributables to your web site
- Change the list of CAB files to be appropriate for your application's needs (see the DirectX SDK documentation for details)
- Change the detection logic to be appropriate for your application. For instance, your application might need the Managed assemblies or might not need the D3DX DLL.
Conclusion
We've shown how you can create a deployment project for your DirectX application in Visual Studio that enables a web-based update to the DirectX runtime components. We delved into the organization of a set of custom actions for coordinating the update of the DirectX runtime with Windows Installer.
We've seen some of the shortcomings of the deployment projects in Visual Studio .NET 2003. These shortcomings still exist in Visual Studio .NET 2005. Fortunately, the rich automation interface provided with the Windows Installer runtime makes it easy to write a small script to work around the shortcomings of Visual Studio.
We've also seen a way to enhance Visual Studio's custom build support for projects lacking custom build steps. By adding auxiliary C++ projects to the solution and configuring the project dependencies, we can get virtually any custom build logic we might require.
Further Reading
In this article, we've touched upon a few technologies with which you might not be familiar. If you're an install developer, you're probably not familiar with DirectSetup. If you're a DirectX developer, you're probably not familiar with Windows Installer. If you have never used JScript or VBScript, you may be surprised to learn how much of your Windows environment can be controlled through COM objects and simple scripts. Here are some links into the MSDN library and elsewhere on the subjects mentioned in this article where you can get additional information.
- MSDN: DirectSetup API reference
- MSDN: Windows Installer documentation
- MSDN: Orca.exe MSI database editing tool
- InstallSite.org, a reference for install developers
- Microsoft Script Center
- MSDN: JScript