Streamlined Crossbar Fairings.
'Way back in the day, all hang gliders (other than the rigid wing gliders) were single-surfaced, with open crossbars. The resulting drag was recognized, and there were many attempts to correct this problem. I looked at the options, and nothing around did the trick for me, then. I built my own streamlined fairings.
Just for background, *any* streamlined fairing is nothing more than a nice decoration, until it reaches a thickness ratio of about four-to-one or more. A crossbar that is 2" (50mm) in diameter would need fairings at least 8" (200mm) in chord. Unless a fairing is aligned in Angle of Attack (AoA) within 5 or 10 degrees of the airflow, it can cause a larger drag penalty than the bare tubing. It would also be helpful if the fairings were lightweight, slick, indestructible, and inexpensive.
I had often heard the pipe-dream of self-aligning streamlined fairings, which would always set themselves to zero AoA. I wasted a lot of time and effort trying to make something which would pivot so easily that they would operate correctly, at hang glider airspeeds. In two words, forget it! Every fairing was tail-heavy, needing large amounts of counter-weights to balance, and nothing would pivot freely enough, to hit the magic "zero" AoA reliably. The added weight needed to balance the fairings (fore-and-aft) is so much, the concept of balanced, self-aligning crossbar fairings can be considered to be totally ridiculous.
Add to that, the possible nightmare scenario of one fairing working, while the other one got jammed somehow, and I was happy to abandon this wildly impractical dream of "self-aligning" streamlined fairings. At 20 mph (30kph), no fairing of any symetrical design, no matter how freely pivoting or how well counter-balanced, ever got close to zero AoA on a tube held out the window of a traveling car, at HG airspeeds. One test is worth a thousand expert opinions.
Some fairings that I tested would actually self-align somewhat, to the point where the rear bottom portion of the streamlined section was near zero angle to the wind, but a line drawn from the nose of that section to the trailing edge was then about thirty to forty degrees inclined to the airflow. This is completely worthless, as streamlining. Self-aligning fairings are a total waste of effort, and may in fact be dangerous.
Here is the latest effort I know about, on video. The "floating" fairings, which set themselves wrong by about forty degrees, create lift (proving that they are NOT set at zero AoA). In flight, they fly upward, hit the limit of the floating crossbar, and then slam down again, to repeat the process. Everybody needs to see this video, if they "favor" the concept of self-aligning crossbar fairings.
http://www.youtube.com/watch?v=REh6iACzHmI
I took some photos of crossbar streamers in flight, and found very little AoA had changed, between normal cruising speed and faster glides. It may be true that a hang glider changes AoA in flight, at various airspeeds, but the air near the sail (where the crossbars live) does not change in direction (AoA) by very much. I could accurately set a fairing to a compromise angle, biased toward zero AoA at normal flight speeds, and gain more than enough benefit from the fairings. Skeptics pointed out that the crossbars would not be streamlined at the correct angles, in a stall. I could only respond that I was not even attempting to streamline a stall.
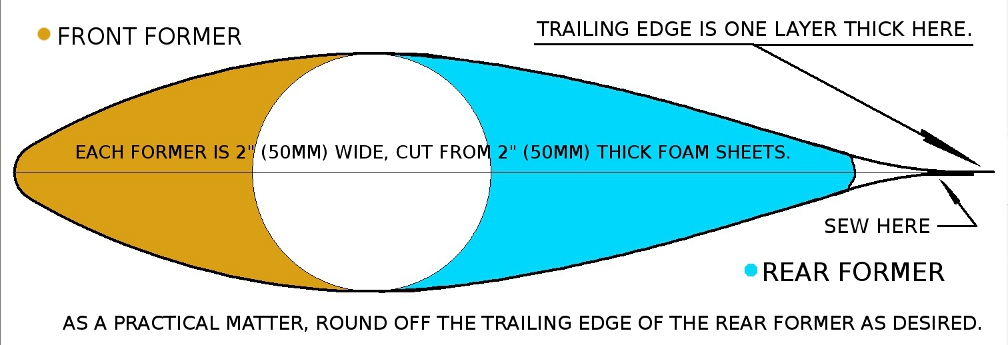
I made my fairings from 0.020" (0,5mm) low-density polystyrene plastic sheet. Each waxy-slick fairing skin was cut to a width of nine tube diameters. One long edge was "folded" gently to the other edge, and these trailing edges were sewed together by a heavy-duty sewing machine. I used very thin, very strong upholstery sewing thread, the UV-proof type. Any fabric store will have it for sale. Each machine stitch was maybe .08" to .10" long. The sheet plastic edges were warmed slightly by a hair dryer for the sewing operation, so the sewing needle pierced the plastic sheet cleanly, without cracking it. Once sewed at the trailing edge, I laid each fairing on a flat surface, and trapped the sewed edges under the edge of a wide board. Rotating the board forward, while holding the sewed edge down with the board, I formed the curve (not a crease) for the leading edge. This plastic material is somewhat flexible, and is familiar to most folks as Frisbee material. I found this material to be almost indestructible, in everyday flying. I carved half-ribs for the inside of the fairings from small blocks of Styrofoam. The "trailing edges" of my fairings were stacked and sewed with a slight offset, so the actual trailing edge was only one layer of plastic in thickness.
There were about twice as many "leading edge" half-ribs (or formers) as there were "trailing edge" half-ribs, along the length of each crossbar. Each half-rib was taped to the crossbar independently, using clear packing tape, and set at the desired angle. Installation then was a simple matter of sliding the sewed fairing skins onto the crossbars, over the half-ribs, and you were done. If any half-rib was in the way for packing up the glider, it could easily be moved a short distance on the crossbar, to eliminate the problem. Any areas of the fairing which needed "beefing up" simply got another half-rib (front former or rear former), at that location. The fairings survived being packed up in the glider bag very well. As constructed, these fairings were mostly empty space inside, with only enough formers inside to hold the airfoil shape in flight.
In use, I found that my target-landing skills were badly affected at first, because the target always seemed to be behind my landing, by a lot. :-) When I learned the correct approach path I needed with a streamlined crossbar, I could easily see the performance improvement that was made by crossbar fairings.
EDIT: If my fairings got damaged/ dented/creased, it was an easy job to slide the fairing skins off of the tube, and "repair" the damage. Lay the fairing skin on a flat surface, and cover with a thin towel. Use a clothing iron on the "cooler" settings to iron out the damage, using no more heat than necessary. Practice on some scrap fairing material, to get the heat setting of the clothing iron correct. Give the iron enough time to stabilize at that heat setting, before you start. Once the fairing skin is restored, let it cool. Then slide the fairing skin back onto the tube, and go flyin'.
Best wishes,
Red