
Soldering can be easy and even fun, but not with dirty tips, soldering irons of the wrong Wattage, poor solder choices, and bad fluxes.
Good soldering is 80% preparation, and 20% execution.
A soldering iron tip cleaner is very good to have here. Make a penny-sized hole in a common sponge. Cut the sponge to fit into a small flat jar, one with a solid cap. Wet the sponge with water. Cap the jar, when finished work.
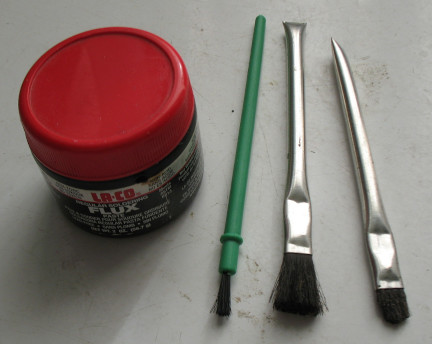
Rosin flux is lame. It does not work well on many metals. Acid flux destroys wires and the copper runs on circuit boards. Acid flux destroys wires by creeping up under the insulation while in work, and no amount of washing can get it out after that. Moisture in the air will keep the acid active, corroding the wires inside, where it can't be seen. Use LA-CO paste flux (non-acid, and LA-CO flux washes away with water). Do not leave any flux on the finished work, not ever. It just causes problems later.
Brushes: hardware stores have cheap "acid brushes;" get a few extra. Cut the metal handles to a good length. The long bristles are wimpy. Make the bristles stiffer by trimming the bristles shorter with scissors. The short bristles will be stiffer. A cheap artist brush is good for applying flux to the work. Stiffen those bristles as needed in the same way as done for the acid brushes.
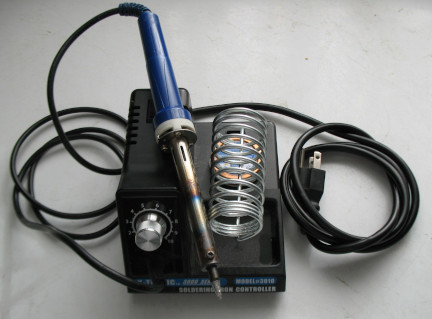
Use temperature-controlled soldering irons. 100 Watt soldering irons will do most small-sized work. Bigger soldering irons do bigger jobs. This is a US$ 50 Soldering Station with temperature control, a handy On/Off switch, and a 70 Watt iron. It's okay for most small jobs. A heavier Wattage station is needed for bigger jobs.
Good visibility of the work to be done will be a game changer.
A good low-power binocular microscope will be a great help with small jobs on the bench. 5X to 15X magnification should be about right. Some microscopes will have separate low-power optics assemblies; select what works best there. That old, one-eyed microscope that a kid gets would be far too powerful here, with the lenses (optics) too close to the work to allow any use of tools. A low-power microscope will provide the space under the optics needed for tools. Check for used binocular microscopes on Fleabay, the For-Sale websites, and the local thrift shops (ask them to check the back rooms).
Low-power microscope, Plan B: I guess I stood still a bit too long, and today's tech just ran right over me. :lol:
Almost any new cell phone will do nicely as a working low-power microscope, for soldering. Older spare phones may have a good Camera funtion. Build some type of bracket or clamp to hold the phone poised above the work, but that can be simple enough. A small collection of Erector Set parts can be had for cheap on Fleabay and other sites, because the real "collectors" want to buy complete, pristine sets. Incomplete sets go for bargain prices.
Then it's a matter of starting the camera function, selecting the highest magnification, and doing a digital Zoom (fingers spreading on the screen) to get a reasonable mag power. There are free "Army Knife" apps available from GooglePlay; one for Android phones, and one for Apple phones. Use the Magnifying Glass function in Army Knife to get various Mag powers automagically. Army Knife also has a Re-Focus button (the CrossHairs button) on screen to get an instant re-focus. In some phones, trying to get too much magnification makes the screen change to a blur; anywhere below that limit can still get a decent mag power and focus. Plug in the USB cable and charger to the phone, so the battery can charge while working.
Who knew? ;)
Then there are the eyeshade/headband magnifiers. Some of these allow using eyeglasses, and some will have multiple lenses that may be used singly or in combinations of lenses, for greater magnification. Some will have LED illumination, but if so, be sure that the LEDs can be aimed as needed.
If the job can be done with lead-free solder, then do so. If a solder alloy is needed, use 60-40 tin-lead alloy. Tin-lead solder carries all of the hazards of lead into the workplace, and the contamination does NOT go away. It is getting scarce, in the retail world. Lead-alloy solder is NOT recommended, due to the health issues of lead.
Soldering irons are really pure copper at the working end, most often. Some soldering tools have replaceable tips. Contact the company who makes the tool, if they are available, for new tips. New soldering tool tips may be coated (plated) with soft iron. Preserve the iron plating which may come on some new tips, if possible. A soft wire brush starts the tip cleaning. That brush may be enough to get the iron clean, and ready to be tinned with new solder again. Once the iron plating gets hopelessly corroded, however, the tip may need to be filed down (when cold) to see the clean copper. All soldering tools were bare copper a few decades ago, so do not be too concerned about any iron plating lost to the file. The tool will work well, with or without the iron plating. Iron plating just makes a soldering tip last longer, and easier to clean.
If necessary, the corroded end of the soldering iron can be refurbished when it is cold. First, use a soft fine-wire brush to clean away the crusty flakes. Use a flat file to shape the copper into a thick, blunt common screwdriver shape, or shape it like a large common nail, with three flat surfaces at the tip, having a triangular cross-section. /\ With only bright shiny copper showing, wrap the tip copper tightly with solder-wire, so the solder-wire looks like a tight coil spring on the tip. Add flux, and turn on the iron at a low setting, hot enough to melt the solder-wire on the tip, but not extremely hot. When the solder melts, wipe the tip clean in the hole in the damp sponge. That process should renew a good working tool. This filing process is rarely needed, but do it when necessary.
Heat up the soldering iron. Clean the soldering tip, bright and shiny, by wiping it into the hole in the damp sponge. Add a little fresh solder to the tip. Clean the tip again, and add a little fresh solder, after every minute of working.
A soldering iron running too hot gets too dirty, too fast, just from the oxygen in the air. Besides that, too much heat can wreck the project. Adjust the soldering iron tip temperature as needed. The wet sponge can clean and cool the too-hot soldering iron, but when using high heat, clean the tip very often.
A too-small (weak) soldering iron will not get the work hot enough to take solder well.
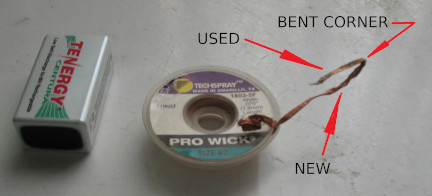
Solder-Wick is a good accessory to have. When heated, it absorbs dirty old solder from the part being repaired. Solder-Wick can made, or purchased at retail. To make some, strip the insulation from foot-long electrical wire pieces that are made with fine copper strands. (For our Metric friends, a Foot is the physical length of that thing found at the end of a leg, normally.) Give the strands a few extra twists, but not too much. Regular Solder-Wick is fine-stranded, and has dry flux in it. No matter if it's DIY or regular Solder-Wick, apply flux, heat, and solder to the very end. When cool, bend the now-stiff end back towards the new material, forming a "bent corner" at the end of the Solder-Wick. To remove dirty old solder from the job, dip the "bent corner" into some flux (not much), and put this "bent corner" against the old solder connection. Put the soldering iron into the "bent corner," and press the Solder-Wick into the old solder, using the soldering iron tip. When the dirty old solder is hot, it will be absorbed into the Solder-Wick, so making a clean start on the work. Remove the Solder-Wick and iron from the work. Use pliers to pull the hot Solder-Wick out straight, let it cool, and make a new "bent corner" in the Solder Wick, for the next use. Repeat as needed, until the connection has no old solder on it.
Whenever it is reasonable, apply fresh solder to both parts of the connection, before they are joined; then use Solder-Wick to clean away all of the excess solder from those parts. Make the connection needed, bending the wire around the part to be soldered, or running the wire into the hole on the circuit board, and bending the end over, on the opposite side of the board.
All set? To make a good solder connection: With all of the old solder gone, use a small brush to apply a little flux to the intended connection. Clean the soldering iron tip by wiping it off into the hole in the damp sponge. Add a tiny bit of new solder-wire to the tip. Set the iron tip into the corner of the clean metals to be soldered, where they meet. Apply solder-wire to the connection, but not touching solder-wire to the soldering iron. When the solder flows smoothly into the connection, pull away the solder wire and the iron. Important! Do not allow the connection to shift or move until the new solder has cooled and hardened on the connection. A disturbed solder joint makes a bad electrical connection.
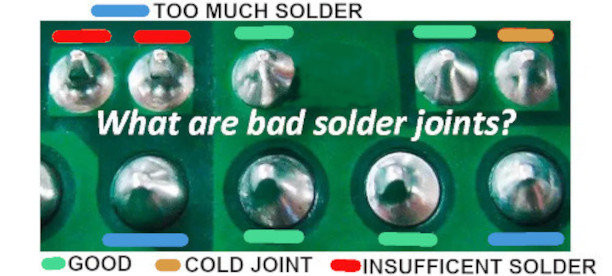
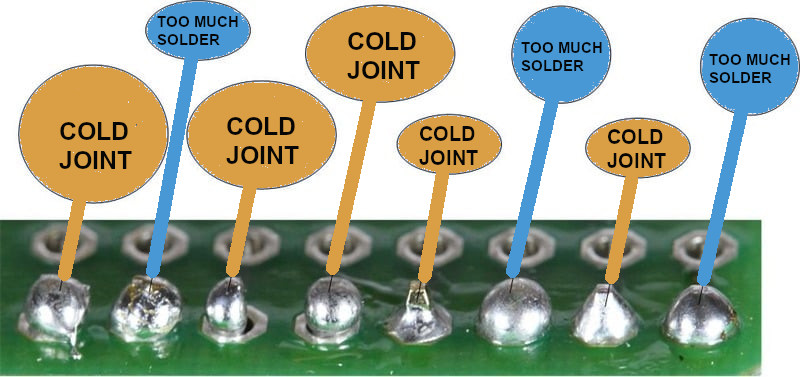
When finished, the soldering done should look smooth and shiny, like silver. The solder surface should be flat or concave, not convex. Use a small stiff brush and a liquid (water or a solvent, depending on the type of flux chosen) to clean away the flux. Leaving flux on the job just causes problems later. Blow away the liquid from the work. Compressed air or canned air is good for that stage of the job. Good and bad connections:
To perfect soldering skills, make up some practice soldering jobs, and check that work. It may come out looking like a mud fence at first, but soon there will be some first-class soldering work, with results that sparkle like new silver.
A local plumbing supply house should have several good fluxes available; rosin is a minimally capable flux, and acid flux is not for electrical work. If acid flux is used for any solder-assembled metalwork, it will need sodium bicabornate, a stiff brush, and water to neutralize and remove the acid flux afterwards. Rosin flux will need isopropyl alcohol for clean-up. LA-CO flux (or similar) is recommended, if available at retail. If not, it is on sale at Amazon. After soldering, wash away this excellent flux with plain water, with no chemicals needed. A few ounces of this flux will do many, many jobs.
Hopefully, there is enough help here to produce good soldering results there. Practice will help.
Resources:
LA-CO FLUX 2 OZ. JAR ~US$ 4.70
De-Soldering braid (Solder Wick) 10' long 0.1" wide US$ 6.00
Acid brushes, 3/8" wide, 12 count, US$ 7.00
Soldering tools, temperature controlled:
100 W soldering station US$ 33.
75 W soldering station US$ 40.
11/25/2025
*
This Web Page was Built with PageBreeze Free HTML Editor