My amateur telescope making page
The "Deep Space Scope" Design
Home | Astronomy | DS-3
| Baffling and Contrast
Introduction
Baffling is done to telescopes to keep as much stray light as possible
from reaching the user's eyepiece and eye. It generally
includes
blocking stray light paths and making the inside of a telescope be flat
black. A poorly baffled or not baffled telescope will have a
brighter background at the eyepiece. A well baffled telescope
will have a darker background at the eyepiece.Baffling 101
After wondering where to begin, I reread the article on baffling a reflector in Sky and Telescope, April 2001. This article, titled "Newtonian Baffling Made Easy" by Gary Seronik, is so good and complete that I will recommend that any ATM get a copy. In a nutshell, Gary states that baffling is a simple matter of looking into the focuser of a telescope, and making sure that the only light you can see is coming from the primary mirror. My way of saying this is that anything that isn't coal mine black (with the exception of the mirrors aiming at the stars) should be, well ... coal mine black. This includes, in order:- The area around the secondary.
- Gary is using a full tube around the secondary cage. He recommends possibly adding a tube extension above the top of the telescope.
- The tube around the secondary is as dark inside as he can get it. He either paints it flat black, or better yet has added black flocking material to the inside of the tube.
- He recommends placing a cardboard or plastic baffle INSIDE of the end of the focuser tube. Make the hole in the baffle big enough that all of the light from the secondary gets to the eyepiece, though.
- All hardware near the secondary mirror must be as black
as
possible. This includes the secondary mounts, the edge of the
secondary mirror, the visible parts of the trusses, and all associated
hardware.
- The area around the primary.
- Basically, you should see NO light around the primary mirror as you look into the focuser, as reflected by the secondary mirror. If you do, add baffling behind the primary mirror.
- If you have a truss scope, if you see the mirror box and/or ground, you have a problem. You may need a smaller secondary, a shroud, a darker observing site or have a problem that you cannot solve.


Various techniques that were used on DS-3.
Engineering and testing (background reading)
Originally, DS-3 used very poor baffling. I originally just
used
a piece of black plastic as a back shield for the secondary.
Shiny black plastic. With white trusses. And a
white rim
of raw glass around the secondary mirror. Ugh.
After a
great deal of testing and being very dissatisfied with my results, I
decided that any telescope should be evaluated under three conditions:- Observations:
- Observing under a partial moon. This is also
like viewing
in the city with street lights that cannot be turned off.
Testing
is very
easy. Look at an object away from the moon. Have a
friend
block the moon's light from hitting the telescope and the ground behind
the secondary. If you see a change, you need to improve
baffling.
- Observing 50 miles from a major city, or medium
skies.
There will be light domes on the horizon. Skies over head will
generally be very good. Testing here has
two components. a) If you notice red flashlights
"brightening"
the field of view when they pass by, or if the background gets brighter
when you secondary is aimed towards light domes, you have a
problem. b) Switch between different baffling schemes - even
quick hacked prototypes. If they help, you need to make them
more
permanent.
- Observing under dark, dark skies. No light domes. Black area on the light pollution map. Same as b) above, although more subtle. Does the background get darker with a baffle behind the secondary? Does the background get darker with a shroud?
- Tests:
- Test: Use a back baffle behind the secondary.
Results:
Didn't help much.
- Test: Cover the back baffle behind the secondary with black felt (that is kind of shiny) from the sewing store. Results: Helped. Not enough, by a long shot.
- Test: Cover trusses with black tape. Results: Minor improvement, if any. Tape was left on the trusses. Note - the top of the trusses are still bare. The secondary blocks this aluminum section of the trusses.
- Test: Added additional baffles (from black plastic notebooks) that were placed ABOVE the secondary ring. Results: Only tested with a moon. Results were very significant. Keeping light from hitting the back baffle helped a lot.
- Test:: Created a half height shroud. Results: Significant darkening of the background. Surprisingly, this was very true under dark skies as well as medium skies.
- Test: Added red flashing lights to the top of the
bearings of
DS-3. Results: With the partial shroud, no one could tell
that
the red light was there.
- Test: Added a baffle inside of the focuser. Results: I didn't notice that much of an improvement, AND I kept knocking it off with a TelVue BIG Barlow 2". Baffle was removed.
- Test: Looking in the focuser, I cannot see ANY ground in
the
reflection of the secondary. Results: I am probably not being
hurt much by the shroud being partial length.
- Conclusions:
- A back baffle is very important. It MUST have the best quality light absorbing flat black material that can be found. It should probably extend all around the area behind the secondary - including above the upper ring.
- Darkening EVERYTHING around the secondary mirror and trusses probably helps - but since I did everything at the same time, and I have been fighting bigger issues, I do not know how much this helped.
- A baffle inside of the focuser is probably not worth it.
- A fairly small secondary makes a lower shroud unnecessary.
- A full surround one third height skirt is necessary for good baffling.
- Anything that blocks light from the moon from hitting the area behind the secondary will give significant improvements when viewing under moonlit conditions.
- Elastic strings work quite well to hold the skirt from getting into the light path.
- A truss based telescope should be designed to allow the
use of
a shroud. Because of this, a 6 to 8 truss telescope is
probably
optimal. Alternatively, a 3 truss scope with numerous strings
to
form a shell for a shroud would work fine.
Baffling DS-3 - what works and what didn't
Generally, a light weight dob like DS-3 ends up being a compromise of
conflicting goals. Here was MY solution, which is currently
working quite well.- Stuff that I did to the telescope that works:
- As you are creating the mirror box, make sure that any holes in the base board of the mirror box are INSIDE of the footprint of the mirror. That way, you cannot see any light around the mirror.
- I painted the inside of the mirror box black, but
probably
didn't need to. I mainly painted it in case it gets wet.
- Paint any and all surfaces of the mirror box and
rocker box flat black that can be seen from above. (My
bearings
are metallic colored. I had to - they just looked SO cool!)
- Cover the trusses with wide electricians tape. This plastic tape is 1 1/2" wide, and can be found at Wal-Mart. It is shiny, so if you can figure out a flatter solution - let me know. Black paint would also work, but would be colder to the touch in the winter.
- Paint the bottom and inside of the secondary ring flat
black.
- Using a black magic marker, blacken EVERYTHING on the secondary cage. This includes: washers, wood dowels, bolts, and ESPECIALLY the edge of the secondary mirror. Another solution that I have read about is to use very flat black flocking material where possible on the spider and secondary edge.
- I used a fairly small secondary mirror. This
keeps stray
light from the ground around the primary from getting into the eyepiece.
- Stuff that I did to shroud the secondary cage that works:
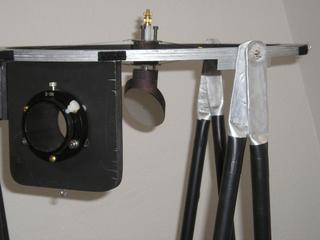
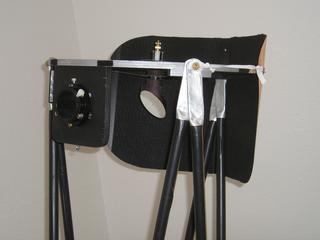
- I created a secondary ring back baffle from a black 3
ring
school binder with the metal part removed. I then glued cheap
black felt
from Wal-Mart to it. It kind of works, but is too shiny.
- (Future enhancement) - I have purchased a clear plastic
desk
pad that is about 19X24 inches. I plan to create a better
secondary back baffle with this. I have a few sheets of
"flocked
light trap material" from Protostar (see Links for the web address)
that I plan on covering this desk pad with. Another option is
to
go with the smaller, binder size plastic, and then use the "flocked
light trap material" on it.
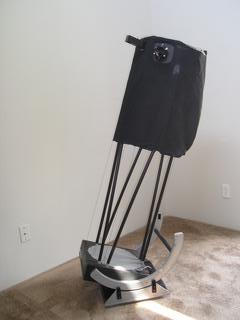
- I added a shroud, which is held out of the light path by
three
elastic strings going from the mirror box to the secondary
ring.
A) Place three small eye screws between each pair of truss holes that
are drilled into the mirror box. B) Add an eye screw to the
bottom of the focuser plate on the secondary ring. C) Add two
more eye screws 120 degrees in each direction from the eye screw on the
focuser plate. D) Make three black elastic cords with hooks
on
the ends, so that they can stretch between the eye bolts (between the
mirror box and secondary ring). (I Picked up some black
string
from Wal Mart in the sewing section.) E) I added one more
elastic
string that goes from the screw on the face of the mirror box (used
with a bungy cord to hold the secondary in it's stowed position) to the
matching upper bolt coming out of the secondary. Tie nooses
at
the ends of this elastic cord. F) Make a cloth
shroud. This shroud needs to be a tube, slightly bigger than
the
diameter of the scope. Mine is the lightest black cloth of
substance that I could get - about 56 inches wide by 22 inches
high. Make a tube, and the tube ends up (laying on the floor
flat) about 26 inches wide by 22 inches flat. Place small
pieces
of Velcro onto the upper ring, and again matching small pieces of
Velcro onto the top of the shroud.
- Compromises that I made:
- Weight. The following add weight to the top of the telescope:
- Skirt and standoff strings. This combination
weighs
about 3 ounces.
- Electric tape on trusses. This probably added
2-3
ounces to the top weight of the scope.
- Back baffle behind the secondary. This baffle
weighs
about 4 ounces.
- Setup time.
- The skirt takes about another 5 minutes to install.
- The back baffle takes another minute or two to install.
- Stuff that didn't work:
- I tried placing a plastic baffle inside of the focuser tube. Unfortunately, a TelVue BIG Barlow 2" is the same length as the focuser barrel, and kept knocking the baffle out. I finally gave up.
- I tried creating a full ring of plastic above the
secondary
ring using cheap plastic from four binders from Wal Mart. It
flopped all over, didn't look good and didn't hold together.