My amateur telescope making page
The "Deep Space Scope" Design
Home | Astronomy | DS-3 | Mirror cell construction


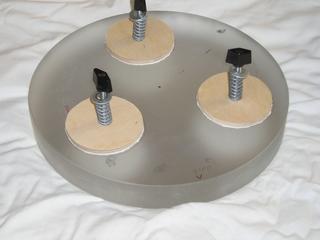
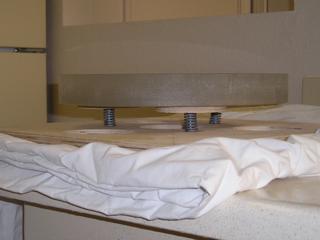
Mirror cell open, and in place on the back.
The mirror cell is a hybrid three point suspension. From star
tests (on
the finished telescope), this mirror cell has worked very well.
It
consists of three groups of the following: double sided sticky tape, a
3
1/2" ring of 1/2" plywood with a hole countersunk in it, and a 2
1/2" X 1/4" countersunk screw. Each bolt has a 1 1/4" spring
that (as a guess) pushes with about 10 lbs force, a washer and a nut
that can
be turned by hand. The holes through the 3 1/2" ring should be a bit
loose, so kind of
wiggle the
drill around in the hole. Be sure to then create the countersunk
hole for
the screw head, making the screw flush with the top of the wood.
- Create the three suspension mounts.
- Place the mirror on something soft - like a towel
- Mark the center of the mirror.
- Mark 3 points, 120 degrees from each other, at a radius of 3 1/2" from the center. This will be the center of each suspension mount.
- Draw circles around each mark, with a radius of 3 5/8"
- Place the suspension mounts on the back of the mirror. DO NOT TAPE YET.
- Mark the center of the mirror box back.
- Notice the holes in the "mirror Cell" and "back plate" in the pictures above and Mirror box construction section. We want to drill holes in this pattern.
- Mark 3 points, 120 degrees from each other, at a radius of 3 1/2" from the center of the back plate. This will be the center of each collimation screw that goes through the back.
- GENTLY, place the back plate onto the mirror suspension mounts (which are still sitting on the primary mirror), lining up the screws with the marks on the back plate. VERY GENTLY push down, making indented marks into the back plate.
- Make sure that the marks on the back plate match with the indentations.
- Drill the holes in the back. These holes need to be about the same size as the screws. In other words, we need them to be snug, but not firm. I used a 1/4" bit (I believe). Run some CA into these holes, to make them stronger. Then, re-drill out the holes. (I believe that I did this by turning the drill bit by hand, just to clean up the rough parts of the glue.)
- Mark the back plate in relation to the mirror. This way, we will ALWAYS be placing the mirror cell into the mirror box back using the correct screw to hole pattern. Notice that the mirror has a ^ mark at the bottom. That was the mark closest to the bearings (rear) of the scope for me. Also, notice that we want the point at the back of the mirror to be BETWEEN two suspension mounts.
- Using DUCK brand double sided sticky tape, tape down one of the suspension mounts.
- Next, tape up another suspension mount. Place it into the correct hole in the back plate. Keeping it off the mirror, thread the back onto the screw of the suspension mount that is already in place. Move the back plate close to the mirror. CAREFULLY, kind of centering this screw, drop the suspension mount onto the mirror. Push it on hard.
- Repeat for the third suspension mount.
- Cut a piece of 1/8" masonite about 1/2" bigger than the hole over the mirror. I messed mine up, so my advice would be to finish this later. Just tape this in place with duct tape at this point.
- Congratulations, you now have a mirror box and a very good, easy to make mirror mount.