North Cedars Crags
![/galleries/cedars_north_tip_2017/016_more_notches_[Sat_Oct_14_13:23:38_MDT_2017].thumbnail.jpg](../galleries/cedars_north_tip_2017/016_more_notches_[Sat_Oct_14_13:23:38_MDT_2017].jpg)
Getting There
This hike starts at the same place as the North Cedars Loop but goes a bit further north.
Follow the directions in the parent page to get to the junction with the main west side Cedars road. Rather than turning here, go straight east toward the mountains for about 0.7 mi. Shortly before reaching the foothills, a side road turns north (left); follow this road along the base of the range for about 2.4 miles. The start of the hike is at a rise in the road where the alluvial fans from two closely adjacent drainages come together. My GPS waypoint for this spot shows UTM 0336289 4513836.
The Route
![/galleries/cedars_north_tip_2017/001_crossing_the_sea_of_cheatgrass_[Sat_Oct_14_10:51:55_MDT_2017].thumbnail.jpg](../galleries/cedars_north_tip_2017/001_crossing_the_sea_of_cheatgrass_[Sat_Oct_14_10:51:55_MDT_2017].jpg)
Start by hiking north and east from the parking area. Climb up to the Provo wave bench and contour along it to the north into the next major drainage.
The drainage has a north fork and a south fork, both interrupted by a major cliff band. Curve into the south fork and ascend to a weak spot in the cliff band on the south side (right) of the draw. Scramble across the bare limestone into the steep bowl above. There are many small cliff bands and areas of talus here that are awkward to cross. Work your way up and north (left) toward the draw.
![/galleries/cedars_north_tip_2017/003_steep_and_loose_[Sat_Oct_14_11:35:22_MDT_2017].thumbnail.jpg](../galleries/cedars_north_tip_2017/003_steep_and_loose_[Sat_Oct_14_11:35:22_MDT_2017].jpg)
Cross the draw to the north (left) and climb steeply across talus toward the next cliff band. You don't need to go all the way up to the cliff, but the footing is a little better higher up. Contour below the cliff into the north fork of the drainage.
![/galleries/cedars_north_tip_2017/006_the_gunsight_[Sat_Oct_14_12:13:31_MDT_2017].thumbnail.jpg](../galleries/cedars_north_tip_2017/006_the_gunsight_[Sat_Oct_14_12:13:31_MDT_2017].jpg)
Somewhat surprisingly, the north fork makes an easy passage through the cliff band. Look for a gunsight-shaped crag far above and to the northeast (left). Head up the fork of the drainage that goes toward the crag.
Toward the top, the route gets steeper and the talus in the draw gets more annoying. At this point, you can climb out of the draw to the south (right) and continue up somewhat easier terrain to the crag.
![/galleries/cedars_north_tip_2017/008_at_the_gunsight_[Sat_Oct_14_12:42:32_MDT_2017].thumbnail.jpg](../galleries/cedars_north_tip_2017/008_at_the_gunsight_[Sat_Oct_14_12:42:32_MDT_2017].jpg)
At the crag, you can scramble through the gunsight — see the route in the middle of the photo. There is a fairly easy scramble down the east side. Alternatively, you can walk north around the crag and head south along the east side.
There is a deep notch just south of the crag that makes a fine spot for a lunch break.
![/galleries/cedars_north_tip_2017/019_another_notch_view_[Sat_Oct_14_13:33:00_MDT_2017].thumbnail.jpg](../galleries/cedars_north_tip_2017/019_another_notch_view_[Sat_Oct_14_13:33:00_MDT_2017].jpg)
Walk south on the east (left) side of the crest. The crest is a long, narrow limestone slab with dramatic cuts that form crags and mesas.
The footing is a bit awkward, with slippery cheatgrass on a moderately steep slope, but in general it's not that bad. Check out the views between the crags. The route climbs very gradually, and bends equally gradually toward the west.
![/galleries/cedars_north_tip_2017/022_the_gang_on_the_high_point_[Sat_Oct_14_13:53:15_MDT_2017].thumbnail.jpg](../galleries/cedars_north_tip_2017/022_the_gang_on_the_high_point_[Sat_Oct_14_13:53:15_MDT_2017].jpg)
Eventually you end up at the top of a draw that leads west (right) to a saddle just north of the final mesa top. Work your way up one of the easy chutes that come down from the ridge, and then it's a short easy ascent to the summit.
![/galleries/cedars_north_tip_2017/024_on_the_east_side_of_the_high_point_[Sat_Oct_14_14:27:51_MDT_2017].thumbnail.jpg](../galleries/cedars_north_tip_2017/024_on_the_east_side_of_the_high_point_[Sat_Oct_14_14:27:51_MDT_2017].jpg)
To make a loop, drop diagonally down to the east (left) and follow the slope down into the valley below. The valley empties to the west; follow it down to the huge pour-off. From the pour-off, follow the top of the cliff south to the next major draw. Cross the draw above the cliff and look for a route down through the junipers to the lower level. Drop into the draw and follow it to the main drainage, which will take you back to your vehicle.
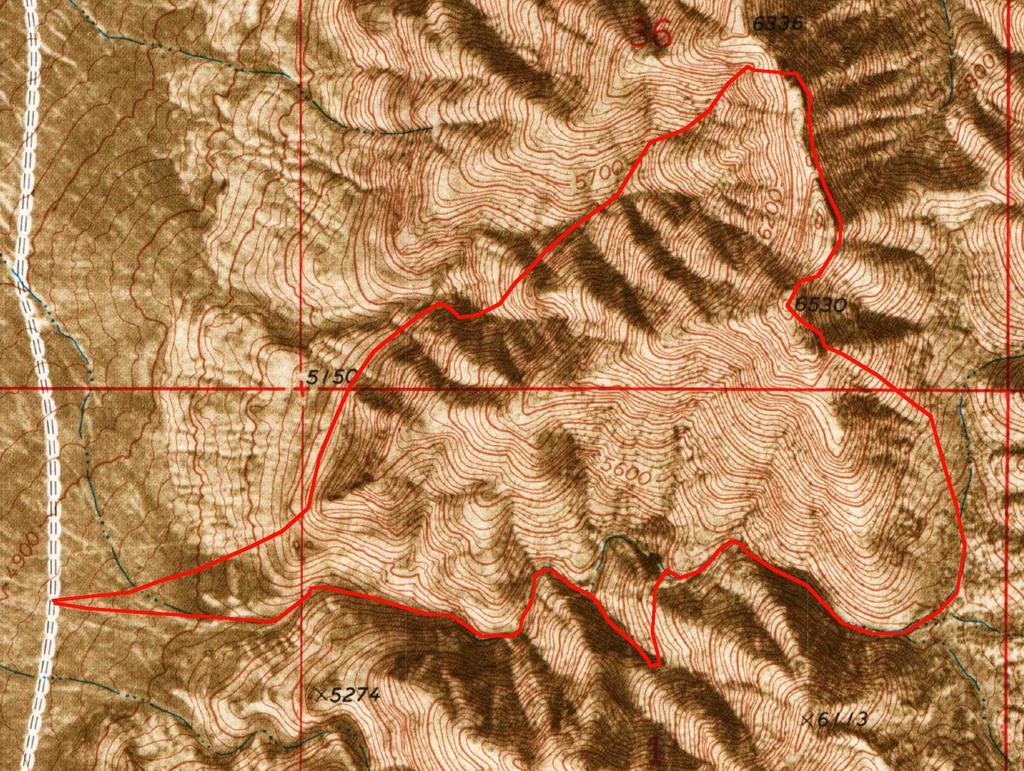
Here is an approximate route map.