Hang Gliding - FAQ - What's needed?
Feel free to save and/or print this out. This part is mostly for pods and cocoons, but applies somewhat to anything except a single-riser pod. There is also a bit here for the knee-hanger harnesses that are still used for students.
Air does not accept excuses, sorry to say. Complete control is essential. Whatever harness that you do select, first, get it set up properly, as described below. Then hang up an old control bar, put on the harness, and hang in. Get upright, and prone, repeatedly. Identify any problems in the shop, -not- later, in mid-air. Don't be shy about rejecting gear that does not do the trick FOR YOU. Other -opinions- really do not count for much, compared to your own observations. Get competent help, certainly - adjustments may be desired. Just don't get railroaded by any one person's opinion; you are pilot-in-command, in there. Ask around.
If any harness is sun-faded, or if the straps are worn excessively (looking fuzzy), or it has any stitching ripped out, do *NOT* use that harness. Do not risk your life and health with a junk harness. An older harness can certainly be safe, if it has been well cared-for, or even over-sewn with new webbing at critical points. A good HG instructor can help you decide when a harness gets too old.
Harness ropes must not rub and wear against the harness main support web straps, at the carabiner. If there is friction between any moving ropes and the main support web straps, connect a welded steel ring to the bottom of the carabiner, to pass the harness ropes through; some harnesses even use a double sailboat pulley there to let the ropes travel more freely, and preserve the ropes from chafing. If a welded steel ring or a pulley system does not give enough clearance to separate the ropes from the main support web straps, add a link or two of heavy welded chain to the bottom of the carabiner, to get clearance. If you use the screw type Rapide-Links, tighten them with wrenches, and use Lock-Tite or a similar thread-locking compound on the threads. Any links that you add should be about as thick and strong as the carabiner. A link failure there would not be a disaster, but it would be uncomfortable; I hate surprises in mid-air.
If there is a foot-stirrup on the harness, make some provision for the stirrup to be stowed safely, during the pilot's take-off run. This can be a loop of Velcro, a snap-buckle, or any method that can secure the stirrup safely at waist level during take-off, yet allow for an easy release by the pilot in flight. Any accidental early release of a stirrup should be regarded very seriously. That problem might trip a running pilot, and accidents on launch should be avoided at all costs; the roads up to launch are usually bad, and may be unknown to rescue crews.
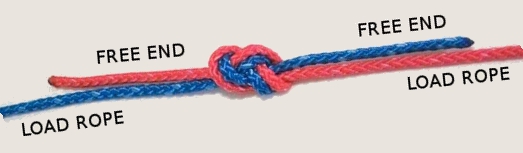
For harness ropes, the only knot that I use is the loop formed by the Double Figure Eight Knot (or "Figure Eight on a Bight"). Consult your local rock climber or Boy Scout Handbook. Yes, it takes lots of rope, and even bit of planning, but there is a reason. Every knot weakens rope; this one weakens a rope less than any others. See:
The loop carries the load, at one end of the knot. The long single rope from the other end of the knot is the rope coming down from the carabiner or link.
If any one harness gives you too much trouble, take it as a fair warning, and look for a harness that is easier to get along with. Do NOT put up with a harness that does not suit you, for any reason, even if the harness was a "bargain". Gear that distracts you from the priorities of flight can be dangerous. Ditch it, if it causes problems; then go find the gear that can really work for you.
Size the harness to fit you, wearing all of your usual flying insulation. Down coats compress inside a harness, which is good for comfort, but not necessarily for warmth. A sweater-vest (sleeveless) can make a world of difference, if you fly with feathers for insulation.
I do not tow, but if you might, it would be a very good idea to check with the local towing pilots, for their input on harnesses.
If at all possible, fly in the harness, before you buy it. That is *not* a reasonable request with new gear from a dealer, but if you buy used gear, the owner might agree with that, especially if you have cash in hand.
Here's a radical approach: if what you have works well for you, don't be in a wild rush to change it. Take your time, and check out the various possibilities. When the right deal comes along, you'll be ready. Again, lessons will provide all equipment necessary, so there is no need to buy, until you can fly. Your instructor will probably provide some help with the choices, also.
Minor repairs to a harness can be made by a harness maker, or a good parachute repair guy (a rigger). Even a well-equipped upholstery shop can do non-critical sewing, such as for new camera or radio pockets, stirrup loops, Velcro, et c. Leave all of the life-critical (weight-carrying) sewing work to an experienced harness or parachute technician, though. If you can break the sewing thread with your bare hands, without cutting yourself, that is *NOT* harness sewing thread. Do not use inferior materials, in any critical harness repairs.
Quick & dirty, for beginners' harnesses:
- Soft pods are easier, warmer, and recommended.
- Cocoons are easier, warm, and recommended.
- Knee hangers are the easiest, not warm, and recommended.
- Single-riser (backframe) pods are slick, warmer, and not recommended.
- Spaghetti harnesses are tricky, not warm, and not recommended.
for cocoons and regular soft (no backframe) pod harnesses:
You should be able to lie comfortably in the harness, kick out of the boot, bring your knees up to your chest, extend your legs out straight without the boot, and rock upright, as you would to land. You should be able to do this with no use of your hands. You should also be able to go from the upright position, kick in, and lie prone; again, with no hands. All this, and comfort, too? If you're game, here we go:
First, you need to get your balance point right. Rig up a way to hang, one foot high off the floor in the shop. Get in the harness, get comfortable, and hold your arms in the flying position. Then, be a rigid statue for the next few minutes. Be ready to protect your nose here. Get two beefy friends to lift you a foot higher, by the main support web straps only. You should come up horizontal, then pivot slowly (that's one to three seconds), head down. If not, for a cocoon, add paperback books to "stand" on, in the boot, until you do. Adding books means the cocoon is too long for you. Carve a block of Styrofoam (of the correct thickness to replace the books) and sew it in place by hand under a sheet of cloth, cut to fit. You do not want this Styrofoam block to move; make it large, flat and comfortable underfoot. Alternately, un-stitch the boot and have a harness maker re-sew it to the correct length. If you pivot "head down" really hard, this means that the harness is too short for you, and it will need an extension sewn into the boot. That's some tricky work, but an expert could do it; still, you might want to consider a different harness first. Some pod harnesses have a simple internal adjustment at the feet, to allow you to set your balance point correctly. If not, apply the Styrofoam block trick, just like it was a cocoon. Oh, yeah, you can relax now :-)
(Use all new ropes for this next part, and leave all of the old ones tied in place for now. Just remove the old ones from the carabiner for now. That way you can always return to the starting arrangement if you hit a snag. This is also a good tip if you are buying a harness with worn or out-of-place ropes. If you can't get it right for you, just remove your new ropes. The seller gets it back, with no changes.)
Second, rig a shoulder-to-carabiner-to-shoulder rope; this is the stop rope. Adjust it in length until you can only go head-level and it stops your rotation there.
Third, if there are pick-up loops available (not present on all pods), rig separate lines on each side of the harness; one rope goes calf-to-'biner-to-shoulder, one goes thigh-to-'biner-to-armpit (or whatever pick-up points your harness may have). These rope lines should not rub across your main web; run them through a separate metal ring, hooked to your carabiner, instead. One welded chain link, by itself, can be used as the separate metal ring. If you have more pick-up points from the head to the mains, than from the mains to the feet, rig a separate line on the extra ones, like you did for the shoulder stop-rope. (The "extra" ones would be the ones that have no corresponding pickup point below the mains.) Do NOT run ropes calf-to-'biner-to-armpit; the ropes nearest the mains should be the shortest. The shoulder lines should be the longest. Also, do not cross ropes, left-to-right; it's too confusing to sort out, on launch. You will have two ropes on each shoulder pick-up point, the suspension line and the stop rope.
Fourth, lie comfortably in the harness while a friend squeezes together each pair of ropes (left & right shoulder, L & R armpit, mains, thighs, calf) separately, in one fist. This lets your friend judge the tension on each set of ropes. Each pair (including the mains) should be carrying an almost equal share of the load. No pair should have twice as much load as the lightest pair's load. Your friend can also add tension to each pair by rotating (that is, doorknob rotation of) the fist holding the lines. If more tension makes any one point more comfortable, shorten those lines a bit. Keep your body angle horizontal and your body fairly flat, not arched up or sagging down at the waist. Adjust all rope lengths as necessary. This takes a while, so don't get in a hurry. We're getting close here. All set? Okay. Skip to the Harness Hang Test.
for knee-hanger type harnesses
First, I want to say that with very few exceptions, a knee-hanger harness is probably one ancient piece of equipment. High Energy Sports in the USA (a very good company to know) still makes new knee-hanger harnesses, but it's not likely that you have one of those, unless you are already with an instructor.
Knee-hanger harnesses do take a bit of "getting used to". They can be okay for lessons, with some help. I like each knee-hanger rope to run from one knee band, through a welded steel ring hanging from under the carabiner, to one shoulder. You should have two separate ropes, one for each knee band. This gives you about the best compromise of freedom to run, comfort, and the landing set-up.
If the knee hanger bands are joined to each other by only a foot or two of strap (a very old style), cut that strap at midpoint with a hot blade. Fold each new end back on itself to form a small loop, and get it sewed it there securely with a heavy-duty sewing machine and harness thread. If you can break the sewing thread with your bare hands, do NOT use it; that is *not* harness thread. Start the knee-to-ring-to-shoulder rope from this new loop.
Using all new ropes, rig each knee-hanger rope to run from one knee band, through a welded steel ring hanging from under the carabiner, to one shoulder. Rig the other knee-hanger rope in an identical fashion. Then rig a third rope, an independent stop-rope from shoulder-to-'biner-to-shoulder, so you can only rotate forward to a head-level prone position. Hanging in the harness in the shop, adjust the stop rope and the knee ropes in length, to give you a comfortable and flat body position, prone. Adjust all rope lengths for comfort, in the same way as is done for a cocoon harness. If there is a lot of pressure at the shoulders (meaning heavy tension on the shoulder stop rope) when prone, the harness body is too short for your body. Consider another harness, if so; a too-short harness will never be comfortable. If there is little or no tension on the shoulder stop rope, you can probably correct that, using a properly adjusted foot stirrup. With a stirrup, you can "set" your body's balance point in the harness, much like you would for a cocoon.
To rock upright, spread your knees, and pull your knees up toward your chest. You want to use each knee to bring each knee-rope *around* the side of your body, so your butt goes back, between the knee-ropes. You should be in almost a "frog position". From there, it should be easy to "sit" back into the harness and rock upright fully. The knee-ropes should now be running up each side of your waist, and behind your arms. Have another pilot show you how all that looks, and then practice it yourself, enough to be comfortable, in the shop. When you flare to land, just straighten your legs out normally as you come down. That is a very natural thing to do, so you hardly have to think about that part. This "frog" technique is not something that you want to try to learn in mid-air; practice this move in the shop first, until it is comfortable and smooth.
At this point, you can either add a stirrup, or skip to the Harness Hang Test.
Most knee-hanger harnesses have small loops at the bottom of the harness body, to attach a foot stirrup. This stirrup is only for comfort; a stirrup should NEVER be the pilot's first concern after launch. For lessons, a stirrup is not recommended. If it gets in the way when running, it could trip a pilot. A foot stirrup can make a knee-hanger harness more comfortable, but you really need a better harness for longer flights. A foot stirrup should also have a Stirrup Step added (see below), if you insist on using a stirrup. A knee-hanger harness can be comfortable if rigged with a stirrup, or without one. If you adjust a knee-hanger harness for use with a stirrup, though, it will not be comfortable in flight, unless you use the stirrup.
*Only* if you do want to use a foot stirrup, proceed as follows: Obtain a short piece of aluminum tube, a bit longer than the width of the pilot's two shoes. Any aluminum tube diameter that passes over the rope-and-tubing (wait for it) is okay. This aluminum tube will be the pilot's foot-rest bar. I like a stirrup rope to be at least as thick as a pen. This rope should be covered, full length, by a single piece of soft flexible tubing. Now, white Nylon rope with clear tubing is a class act; old Purlon with garden hose for a covering says that you are poor, but resourceful.
With the pilot fully prone, tie a stirrup rope to one of those two stirrup attachment loops. (If you did not find any loops of strap at the bottom of the harness body, you can have them added by a harness maker, a parachute repair guy, or even a good upholstery shop.) Stirrup loops should be located along the bottom of the harness body, at sides of the pilot's thighs, with the pilot lying prone in the harness.
Put the rope through the foot-rest bar, and set the foot-rest bar against the soles of the pilot's feet. Tie the stirrup rope temporarily to the second attachment point, using a slip-knot. Adjust the length of the stirrup rope, so that the pilot can use the stirrup to pull the main body of the harness down to the most comfortable position on the pilot's body. At a minimum, this adjustment should relieve all pressure from the crotch area. The pilot may wish to "center" the arms in the arm openings, also, using this adjustment.
When the stirrup length is correct, mark the rope where the temporary knot passes through the harness attachment point. Untie the temporary knot, string the rope out to its' full length, and remove the foot-rest bar. Measure out a piece of soft flexible tubing, long enough to cover the rope from the first knot, almost to the mark. Blow a thin string through the tubing, and use that string to pull the stirrup rope completely through the tubing. Slide the foot-rest bar over the flexible tubing, and tie the rope back to its' attachment point. With the pilot prone and comfortable, set the foot-rest bar against the pilot's soles again. Get the comfort adjustment correct again, and tie permanent knots to hold the adjustment. Allow some reasonable extra rope length for future adjustments, and cut off any excess. Mark the flexible tubing at each end of the comfort bar.
Add a Stirrup Step to the foot-rest bar; see the section on making and using a Stirrup Step. When everything is correct, set the harness on a solid surface and flatten the foot-rest bar somewhat, with a large hammer. Make the foot-rest bar "grip" onto the flexible tube of the stirrup rope, by flattening the ends enough that the foot-rest bar can not slide out of position. Fanatics (like me) can cover the foot-rest bar with grip-tape, to prevent slippage in flight.
Again, now that you have a foot stirrup, make new comfort adjustments. Hanging in the harness in the shop, adjust the knee ropes in length, to give you a comfortable and flat body position, prone. Adjust all rope lengths for comfort, the same as is done for a cocoon harness (see "Fourth" there).
When landing, step out the front side of the stirrup, so the stirrup goes behind your legs; then do the "frog" trick, to rock upright.
Skip to the Harness Hang Test.
For single-riser pods:
I do not recommend a full-competition harness for new pilots. A conventional soft pod (no back-frame) or a cocoon just makes a lot of sense for a low-time pilot. If you have a single-riser pod, it may present a challenge for the new pilot, particularly for landings. If you experience difficulty with advanced equipment like this, I would advise against taking unnecessary risks. It may be wiser to either sell it, or store it, until you are at least an intermediate pilot. A few months of patience (and flying experience) can make the difference needed in your ability to deal with any possible distractions in flight.
When you rock upright to land, a single-riser pod -may- limit your ability to fly fast, and fast approaches are necessary for safety. The vital issue is how much you can pull in, while flying upright. If you can not pull in as much as with a conventional two-riser harness, you will be making slower (thus more dangerous) approaches. Buy the gear that works best for you, not the hottest, most expensive and most demanding equipment available. Not yet, anyway.
When you first fly the newer harnesses, get upright while you are still soaring, and be sure that you can pull in enough for a fast and safe approach. Finding that last bit of speed when upright should be done while soaring, not during your first approach. Then, you can get prone again, relax, and enjoy the flight. If there is any problem, you can choose the most forgiving Landing Zone available. Pick a familiar site with the best LZs, for the first few flights with a new harness. That advice applies to *any* new flying gear, also.
A single-riser harness will not be a noticeable improvement in flight. A full-competition harness might not be what a savvy pilot would choose for their daily flying, either. Your harness can easily move from this glider to the next. Control and comfort should be the serious, long-term considerations for your first harness.
If you have a single-riser pod, you will need the owner's manual to get it set up properly. If there is no shoulder (torso) stop-rope, maybe you should rig one, as described for cocoons. Safety is more important than drag, really.
Skip to the Harness Hang Test.
for spaghetti type harnesses
Spaghetti harnesses are complex-looking; the many ropes gave them their name. Properly fitted, they can be very comfortable. I do not recommend them for beginners, though. Each foot is in an individual stirrup, but that is both good and bad news. There is nothing for the pilot to do except fly, with this harness. Unfortunately, during launch, or in a running landing, this type of harness can lift you -by the feet-. This means that in a running stride, you reach for dirt with one foot, and it gets stopped in mid-air by the harness. You suddenly have less traction than on ice, and you can imagine the rest. Well-experienced HG pilots can certainly make allowances for this, but beginners do not need such surprises. An illustration: tie a loop of rope between the parallel bars at a gymnasium. Set the loop at the right height so that it will support your weight on one foot, just barely above the floor. If you were to walk forward and step smoothly into the loop, your foot would never touch the floor, and you'd fall badly. It's like you stepped on a skateboard by mistake; suddenly there is no traction. This is -not- something to experience, while learning to fly.
There are techniques that allow experienced HG pilots to use spaghetti harnesses, and still launch and land safely. These harnesses are certainly very comfortable in warm weather, but they are no help if you fly in cold air. At very high altitudes, it's always cold.
Like the single-riser pod, though for very different reasons, I do not recommend these for new pilots. Changing from the prone flying position to upright, for landing, is best done using the "frog" technique, described in the knee-hanger section. If there is not a separate shoulder stop rope, I would recommend adding one, as with any other harness.
now, for the Harness Hang Test:
Now you need a place to hang your harness, away from any obstacles, with you in it. A rafter or structural beam is usually the best option. Whatever support that you may choose, make sure that this attachment point is strong enough to hold much more than your own weight. Rig an old hang loop, or any sufficiently strong rope, at a height that lets you hook in with the carabiner while standing on the floor.
Get a book to read, some music, a straw, and something to drink. Hook in to your shop's hang point, and let your full weight down into the harness. Rotate to your normal flying position, stretch out long, then relax. Hang in for about one hour. Read your book, have a sip, listen to tunes, or shoot the bull. Twenty minutes is not enough. If the harness bites anywhere, adjust that part out. If the harness cuts you under an armpit, try adding one book (not more) to the boot of a cocoon or pod. If you have a knee-hanger harness, either adjust the stirrup length, or the harness may be too long in chest-height for you. If it cuts into the sides of your neck, these straps on the harness would need to be re-located outward, or you might consider another harness. If it cuts under the front of your arms, the harness may be too wide for you. Again, an expert harness maker might save it for you, but you should consider another harness, instead. If the harness bites you anywhere, after hanging for an hour in the shop, it will bite you in the same places after an hour in the air.
I suggest that anyone should make that hour-long hang check on any harness that they plan to buy. --The sound that you just heard was a hundred shops yelling "Nooo, DON'T tell 'em that!". :-)
Most pilots can manage to kick the stirrup of a harness out of reach, when they try to get the first foot (MORE)