Hang Gliding - FAQ - What's needed?
For most hang gliders, the position of the "hang loops" that carry the pilot's weight will determine the airspeed that the glider will fly, "hands-off", with no pilot input. *ONLY* if necessary, these hang loops can be re-positioned on the keel to "set" that correct airspeed. This adjustment is referred to as the Center of Gravity (CG) or "trim speed" of a hang glider. (In reality, every aircraft has a CG, and any aircraft will have very serious control problems if this "balance point" for the aircraft is too far wrong.) Once this important adjustment is made, it is vitally important to maintain this setting, correctly, for the inexperienced HG pilot. No new HG pilot should attempt to adjust "trim speed" to "their" correct airspeed by trial and error. The errors can be too costly.
Any beginner's hang glider should be set up to fly naturally at the correct airspeed. An experienced HG pilot (usually the seller) should make this CG adjustment, then -demonstrate- the serene art of hands-off HG flying to the new owner/HG pilot. The expert HG pilot's weight should be equal to that of the new HG owner, as close as possible. The new owner's harness should be used by the HG expert, also, for these few "trim flights". Then the results will be as accurate as possible. Again, a new HG pilot should *not* attempt to adjust, or even test, this CG setting. Seek ONLY expert help.
On some hang gliders, this CG adjustment could be changed accidentally due to transportation on top of a vehicle, or even flying in heavy turbulence. I do not say this to worry anybody, but instead, to stress the importance of this next item. The hang loops for any hang glider should be secured in a way that makes any fore-and-aft movement impossible. Some hang gliders have this CG setting locked, by bolts. No problem there! Some gliders rely on little more than friction to hold this important CG setting. Unless your hang loops are bolted in place by the factory, you will need to secure them in the correct position to obtain the correct airspeed, with no pilot input. Temporarily, mark the keel exactly where the expert pilot has set the hang loops, using a magic marker or pieces of tape -use no pens or pencils on aluminum airframes.
Obtain two automotive screw-type hose clamps. Install them on the keel temporarily, just snug, and mark where the thread-band enters and exits the screw adjuster of the clamp. Remove the hose clamps, and cut (or break) away the excess thread-band material. Cut a piece of plastic sleeving to fit over the thread-band strip. Heat shrink tubing is good here, and the marine-grade heat shrink tubing is even better, but any sleeving is better than none, here. It will protect your hang loops from possibly being worn or damaged by the clamps. When the clamps are ready to install, only the part of the threaded band where the screw adjuster will be locatead will be exposed bare metal. The screw adjuster will cover that part. No bare metal should touch the keel or the hang loops, when finished here.
Install these two automotive hose clamps on the keel, one on each side of the hang loop. Put each clamp as close as possible to the hang loop. Run a short straight piece of nylon webbing strap along the keel. Pass it under the front clamp, over the hang loop, and under the rear clamp. Tighten both the clamps firmly, and trim off any excess material from the clamps and the strapping. The hang loop should not be able to move at all, when you have everything tight. The nylon strap is important. It both holds and protects your hang loops.
Nylon strap can be cut and seared (to prevent fraying) in one operation, using an old soldering iron. Be very careful with this "deadly weapon", anywhere near your sail. Plug it in, use it, then unplug it and put it *far* away, ASAP. Don't ask :-} The nylon strapping can be positioned on either side of the keel, or on top.
The clamp adjusters MUST be positioned where they can't damage the sail, or anything else, especially when the glider is folded up for transport. These adjusters could cause dangerous dents in the airframe tubes, if placed carelessly. The clamp tighteners should be "covered" safely by pushing each one into a short piece of thick clear soft plastic tubing. Clamp tension will hold the clear tubing in place over the tightener. Once you are sure where the clamps will be, mark the keel tube at those places. Loosen and slide everything aside for a minute, and wrap the keel where the clamps will be with one layer of clear plastic tape. This will protect the keel from any contact with the steel clamps. That will prevent the corrosion caused by the contact of "dis-similar metals". Re-install everything in the correct places, and now your trim speed (CG) will stay right where it gets set.
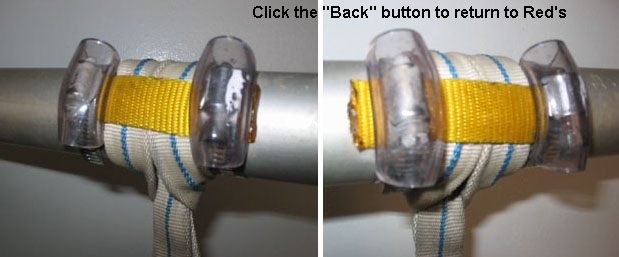
A picture is worth a thousand words. Here are two. The clamp screws are covered by clear plastic tubing, to protect the sail and (maybe) the airframe tubing when the glider is folded for transport. The yellow webbing strap holds the hang loops in the correct position, fore-and-aft, and prevents the clamp screws from chafing the hang loops. In reality, there must be two hang loops, a primary and a back-up, on every hang glider flying. The back-up hang loop has only been removed temporarily, to make the pictures clearer. The primary hang loop, seen in these pictures, is the white webbing with a blue stripe.
Locking the Center of Gravity setting
That should do the trick for you. I always use this "option" on my gliders, since 1982, and it's about bullet-proof. :-)
Free Variometer
Okay, you paid for lessons, bought a decent glider, a parachute with a para-swivel, a comfortable harness, and a helmet. Now, you fly (MORE)