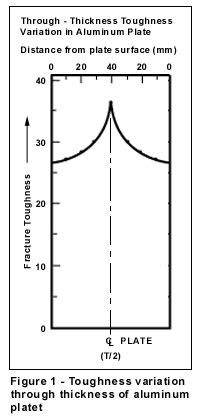
One significant advantage of the Short Rod (SR) method for measuring plane-strain fracture toughness (ASTM standard E 1304), is that the smaller test specimen size allows a more local measurement of fracture toughness. This ability to measure a localized value of fracture toughness has been of particular value in characterizing the toughness of aluminum plate. Figure 1 shows the fracture toughness as a function of depth below the surface of the plate, for one specific aluminum alloy.
 Note that the fracture toughness is significantly higher at the center of the plate than at the surfaces of the plate. This variation of toughness could be either an advantage or a disadvantage, depending on the ultimate use of the material. In either case, it is important information for the user of the product in a fracture-critical application. This information would not be available without the Short Rod, or similar fracture toughness test using a small test specimen.
Size Dependence of F T Tests
Both Short Rod and Compact Tension (E 399) test methods include validity requirements that specify the minimum specimen size that may be used to obtain a valid plane-strain fracture toughness test result. When a test specimen of minimum size is tested, the crack front width is large enough that the majority of the crack front is subject to plane-strain conditions. In a material with a homogeneous toughness distribution, fracture toughness measurements will be essentially size independent as long as the test specimen size exceeds the minimum dictated by specimen validity requirements.
In the case of a material with a non-homogeneous toughness distribution such as the aluminum plate shown in Figure 1, fracture toughness test results can no longer be independent of the size of the test specimen. In a fracture toughness test, a test specimen has a crack front of some finite width at the time of the toughness measurement. Thus, toughness measured is essentially the average of the toughness over the width of the crack front. In the case of the aluminum plate of Figure 1, if two fracture toughness measurements are made at the center of the plate, one with a minimum size specimen, and the second with a test specimen twice the size of the minimum specimen, the larger test specimen will give a lower value of fracture toughness. The smaller test specimen will make a measurement that includes only the very toughest material in the center of the plate. The larger test specimen will make a measurement that includes this same high toughness material, but also some material on either side of lower toughness.
Comparing KIc and KIv in Aluminum Plate
 Because Short Rod (KIv) and Compact Tension (KIc) are typically different size specimens, the two tests will measure different toughness values in aluminum plate for the reasons discussed above. Even in cases where test specimens of the same width (B dimension) are used, the SR specimen still samples a smaller width of material. In the SR specimen, the crack front width is only about one third of the specimen width at the time of fracture toughness measurement. In the CTspecimen, the crack front width is the full width of the test specimen. Thus, in aluminum plate with non-homogeneous fracture toughness distribution, KIv and KIc cannot be compared, even though the two tests measure the same material property and give substantially equal values for fracture toughness in materials with homogeneous toughness distribution (see Technical Note 504).
The relationship between KIv and KIc for a given aluminum alloy and a given plate thickness also depends on the location at which the measurements are made. Two common test locations are discussed below. The first is at the center of the plate (T/2). The second is at the quarter-thickness point of the plate (T/4).
T/2 Measurements
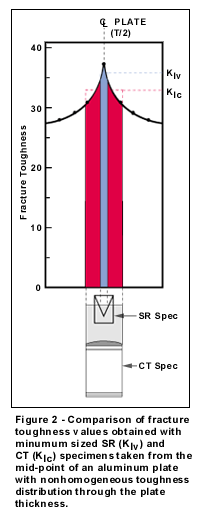
Figure 2 is a graphical representation of a Short Rod test specimen and a Compact Tension test specimen of minimum size taken from the T/2 location and oriented in the L-T or the T-L direction. Because of the narrow crack front in the Short Rod specimen, only the toughness of the very toughest material in the center of the plate (light shaded area in Figure 2) is measured in the KIv measurement. The Compact Tension specimen, with a crack front width of almost six times that of the Short Rod specimen, includes measurement of less tough material on either side of the higher toughness region measured by the Short Rod specimen. Thus, the KIv result is substantially higher than the KIc result.
T/4 Measurements
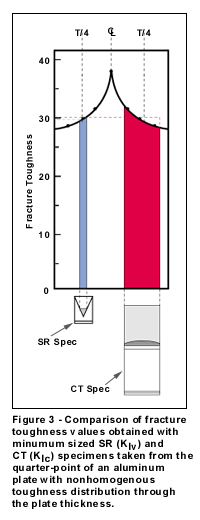
 Figure 3 is a similar graphical representation of a Short Rod test specimen and a Compact Tension test specimen of minimum size taken from the T/4 location and oriented in the L-T or the T-L direction. The crack front widths of the two test specimens are the same as in the illustration for the T/2 location, but in this case, the wider crack front width of the CT specimen allows it to include more material from the high toughness region at the center of the plate. Thus, in this case, the KIc value can be slightly higher than the corresponding KIv value.
Effect of Crack Orientation
The preceding discussion focused on fracture toughness tests in the L-T or T-L directions, where the plane of the crack is the same as the plane in which the fracture toughness varies through the plate. Toughness tests in the S-L or S-T directions should not show any effect of toughness variations, because, in these orientations, the plane of the crack is in a plane of constant toughness. However, very small differences in the location of the test specimen relative to the center of the plate could result in differences in toughness measurements from specimen to specimen. Test specimens taken from the exact center of the plate should have higher toughness than specimens taken slightly off center. Toughness tests in the T-S or L-S directions show a different effect. In these cases, toughness varies in the direction of the crack length. Thus toughness will either increase or decrease with increasing crack length. In an E 399 test, this change cannot be detected because fracture toughness measurement is made at one specific crack length, the length of the fatigue pre-crack. In the case of the Short Rod test (E 1304), a quasi-steady state crack is propagated through the test specimen, and fracture toughness can be measured over a finite distance of this crack length. Thus these test specimens allow the changing fracture toughness with crack length to be measured.
Additional Data
Both Brown (1) and Barker (2) have published substantial amounts of data showing the through-thickness variation of fracture toughness in a number of aluminum plates.
(1) Brown, K.R., Chevron-Notched Specimens: Testing and Stress Analysis, ASTM STP 855, 1984, pp. 237-254.
(2) Barker, L.M., Chevron-Notched Specimens: Testing and Stress Analysis, ASTM STP 855, 1984, pp. 117-133.
TN 501 | TN 502 | TN 503 | TN 504 | TN 505 | TN 506