
Lot release testing to measure plane-strain fracture toughness is required for aluminum alloys to be used in fracture-critical applications. Traditionally this testing has been done using Compact Tension (CT) test specimens in accordance with ASTM standard method E 399. A large data base of KIc test data has been generated as a result of this testing.
The low cost of the relatively recently developed Short Rod (SR) test method (ASTM E 1304, "Standard Test Method for Plane-Strain (Chevron-Notch) Fracture Toughness of Metallic Materials.) has resulted in a significant amount of testing to determine correlation between KIc data, and data from the SR test, KIv. This Technical Note summarizes the results of four such correlation efforts.
Data Basis
The data that is summarized in this Technical Note includes the following:
- K. R. Brown, "An Evaluation of the Chevron Notched Short Bar Specimen for Fracture Toughness Testing in Aluminum Alloys." Kaiser Aluminum & Chemical Corporation, Center for Technology, October 1, 1981.
- K. R. Brown, Kaiser Aluminum & Chemical Corporation, Center for Technology, unpublished data in of the form of spreadsheet data files.
- Alcoa private information in the form of plots of KIv vs. KIc data.
- J. W. Bray, "Use of the Chevron-Notched Short Bar test to Guarantee Fracture Toughness for Lot Release in Aluminum Alloys," Chevron-Notch Fracture Test Experience: Metals and Non-Metals, ASTM STP 1172, K. R. Brown and F. I. Baratta, Eds. American Society for Testing and Materials, Philadelphia, 1992, pp. 131-143.
The above data sources include a total of 3,330 CT and SR tests resulting in 1,610 data pairs. All of the materials are aluminum alloys, including 12 different alloys in plate form, 6 alloys in extrusion form, and 3 alloys in forging form. Tests in plate material come from a variety of plate thicknesses. Typically three orientations (L-T, T-L, S-L) were tested for each material condition.
Note that the figure numbers used in this Technical Note are the figure numbers from the original report where applicable, thus figure numbers in this technical note are not consecutive.
Position of ASTM Standards
ASTM standard methods E 399 and E 1304 are both test methods which, when standard validity criteria are met, result in ASTM-acceptable values for plane-strain fracture toughness, KIc and KIv respectively. The Bias section of each of these standards contains the statement, "There is no accepted standard value for the fracture toughness of any material." E 1304, the more recent of the two standards adds the following statement, "KIv ... may differ from KIc ...[therefore] it is necessary to generate correlative data for the material of interest to substantiate the relationship between the two values." Thus, in materials where KIv and KIc are not the same, the standards make no attempt to determine which of the two more closely represents the actual plane-strain fracture toughness of the material, but do suggest that correlative tests are appropriate to determine the relationship between the two values.
Theoretical Basis
Both ASTM E 399 and E 1304 are based on the same LEFM principles. When LEFM assumptions are met, both tests should generate the same value for plane-strain fracture toughness. For many materials, this is true. Technical Note 504 presents data comparing KIv and KIc for a wide range of materials and fracture toughness values.
Through Thickness Toughness Variations in Aluminum Plate
In comparing KIv to KIc values in Aluminum alloys, it is important to understand how the properties of the aluminum plate affect the comparison of these two values. Aluminum alloys, in plate form particularly, exhibit non-homogeneous fracture toughness through the thickness of the plate. The effect of this non-homogeneity on measured values of KIv and KIc is discussed in detail in Technical Note 505. A more brief discussion of this effect is given below. The importance of this non-homogeneity effect must be understood in order to differentiate differences between KIv and KIc due to real fracture toughness differences between two test specimens as opposed to differences between the test methods.
Figure A shows fracture toughness as a function of depth below the surface of the plate for one specific aluminum alloy. Note that the fracture toughness is significantly higher at the center of the plate than at the surfaces of the plate. This general behavior is typical of most aluminum alloys used in fracture-critical applications, although the shape of the curve varies from alloy to alloy.
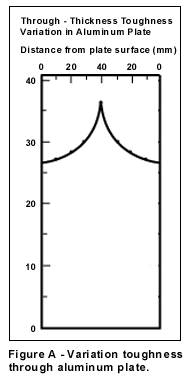 Minimum size requirements for both SR and CT test specimens have been selected such that KIc and KIv measurements are essentially independent of test specimen size. These criteria, however, assume uniform fracture toughness across the width of the crack front in the test specimen. In the case of the aluminum alloy plate shown in Figure A, for test specimens taken at the center of the plate, a smaller test specimen will measure only the very toughest material at the center of the plate. A larger test specimen with a wider crack front, will "average" fracture toughness over a larger section at the center of the plate and, hence, will indicate a lower value of fracture toughness. Even though this difference in indicated values is manifest in test specimens of different sizes, it is not in reality a size effect. We have chosen to call it, rather, a "non-homogeneity effect." The ratio of two different toughness values measured with two different specimen sizes is then called the "non-homogeneity ratio."
One of the advantages of the SR test specimen is that it allows a valid plane-strain fracture toughness test to be made using a much smaller test specimen than can be achieved with a CT test specimen. When KIv values are compared to KIc values, a significant non-homogeneity ratio is observed. As explained in Technical Note 505, for measurements taken at the center of the plate (T/2), the non-homogeneity ratio will be greater than unity for tests in the L-T and T-L directions. The non-homogeneity ratio should be unity in the S-L and S-T directions for test specimens taken at T/2. For test specimens taken at the quarter point in the plate (T/4), the non-homogeneity ratio in the L-T and T-L directions will be slightly less than unity in some alloys, and slightly greater than unity in others, depending upon the shape of the curve shown in figure A.
Other Factors
Although the non-homogeneity ratio is the most significant factor in understanding numerical differences in KIc and KIc values, several other factors must be considered as well.
In some cases, particularly in thinner plates and/or higher toughness alloys, CT test specimens may not be of adequate size for a valid KIc measurement. The specimen design of the SR specimen is such that valid KIv measurements can be obtained with smaller test specimens. Thus, in some cases, invalid KIc values are compared to valid KIv values.
The other factor that affects comparisons of KIv and KIc values is that over the decade (1980-1990) when the data of this Technical Note were taken, the data reduction method for the SR test specimen was in a state of evolution. No attempt was made in this Technical Note to adjust data to reflect E 1304 data reduction methods. Technical Note 511 addresses these differences in data reduction methods and gives formulas for converting data reduced under older methods to the E 1304 standard. Generally these adjustments are of the order of a few percent.
Kaiser Aluminum Data
This data was published in a report titled, "An Evaluation of the Chevron Notched Short Bar Specimen for Fracture Toughness Testing in Aluminum Alloys," by K. R. Brown, dated October 1, 1981. This report contains data from 230 short bar and 120 compact tension tests. Data for the Short Bar tests was reduced in accordance with the equation originally proposed by Barker:

KSB is the nomenclature used in this report for Plane-Strain Fracture Toughness measurements using Short Bar test specimens. This was prior to the designation of Short Bar and Short Rod results as KIv by ASTM E 1304.
The data in this report is primarily from material in plate form. Pates of nine different alloy conditions are included, with several plate thicknesses for each alloy. A few test results are also included for four extrusion alloys and one forging alloy.
In addition to presenting the comparative data, the report discusses the effect of non-homogeneity of fracture toughness through plate thickness as mentioned earlier in this Technical Note.
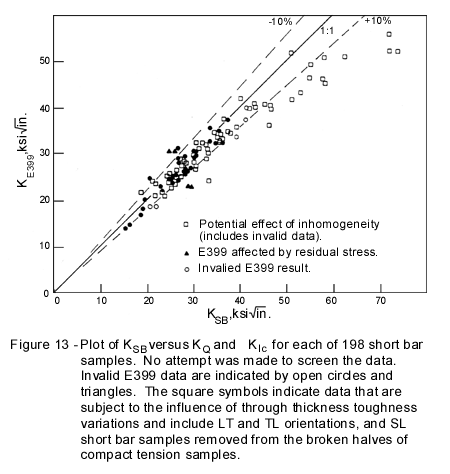
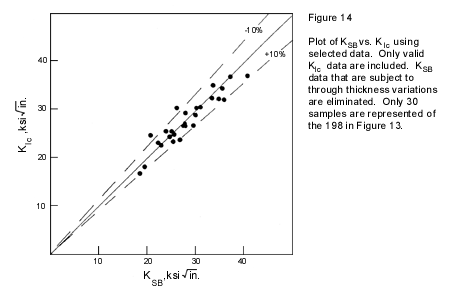
Two figures from the report are reproduced to summarize the data.
Figure 13 plots 198 data pairs of KSB vs. KIc. All data from the study is presented in this figure, including data points comparing invalid KIc with valid KSB, as well as data influenced by the non-homogeneity factor discussed earlier. As has been discussed, this factor is particularly evident in higher toughness alloys, thus the plot becomes less linear and more variable at higher toughness values.
Figure 14 plots selected data from the study. In this case, only data where both KIc and KSB are valid, are plotted. In addition, data which are affected by the non-homogeneity factor are also excluded. The remaining 30 data pairs are plotted, showing 1:1 correlation between KSB and KIc test values.
Kaiser Aluminum Data - Unpublished
This data has been collected by Kevin Brown at Kaiser Aluminum and Chemical Company. The data includes 360 KIv/KIc data pairs. Data comes from six different aluminum alloys in plate form. Test specimens were typically taken in three different orientations and from a variety of plate thicknesses. Of particular interest in this set of data is the large number of data pairs for some of the material conditions. These large number of pairs provide an indication of the consistency of fracture toughness from lot to lot of a particular alloy.
To summarize this data, three tables have been generated. Each row in the tables represents a different material condition. The number of data pairs for that condition is indicated and an average value and standard deviation for the KIv and KIc values is calculated. The final column is the ratio of the average values of KIv and KIc, or the non-homogeneity ratio discussed earlier.
The three tables of data are organized by crack orientation. Table 1 includes the data for tests in the S-L and S-T orientations. As discussed earlier, no non-homogeneity effect is expected in this test orientation. This is indeed the result as the non-homogeneity ratio for all of the material conditions in this table is approximately unity.
Table 2 summarizes data in the L-T direction. In this direction, a non-homogeneity ratio greater than one is expected for test specimens taken at T/2 locations, due to the substantially narrower crack front on a SR test specimen as compared to a CT test specimen. At T/4 locations, a non-homogeneity ratio closer to unity would be expected. No indication is given in the data provided to differentiate T/2 data from T/4 data. Standard aerospace specifications, however, generally require test specimens be taken at T/2 for thinner plates and at T/4 for thicker plates. The non-homogeneity ratios for the tests from 6" (and 5.7") plate are generally closer to unity than other plate thicknesses in the table.
Note that the non-homogeneity ratios for the 7475-T7351 alloy are significantly higher than, for example, the same ratios for the 2124-T851 material. This is consistent with other data showing a large difference in fracture toughness from the surface of the plate to center of the plate in 7475 material, and a much more uniform fracture toughness through the thickness of a 2124 plate.
Table 3 summarizes data in the T-L direction. Once again a non-homogeneity ratio greater than unity is expected. These ratios are somewhat closer to unity for this direction than for the L-T direction for the same material condition. This suggests a somewhat different profile for the through-thickness toughness variation for the T-L direction compared to the L-T direction.
|
Alloy |
Plate |
Crack |
No. |
KIc |
KIv |
KIv/KIc |
||
|
Thickness |
Orient. |
Tests |
Ave. |
Std Dev |
Ave. |
Std Dev |
||
|
7475-T351 |
2.75" |
S-L |
8 |
37.9 |
2.83 |
36.1 |
2.73 |
0.95 |
|
3.00" |
S-L |
21 |
34.7 |
3.26 |
33.8 |
1.40 |
0.97 |
|
|
2124-T851 |
6.00" |
S-L |
3 |
20.4 |
3.06 |
20.4 |
0.33 |
1.00 |
|
7050-T73651 |
2.25" |
S-L |
3 |
29.3 |
3.07 |
29.3 |
2.70 |
1.00 |
|
3.50" |
S-L |
3 |
30.0 |
0.42 |
27.9 |
1.60 |
0.93 |
|
|
4.00" |
S-L |
10 |
30.1 |
0.96 |
30.7 |
1.50 |
1.02 |
|
|
6.00" |
S-L |
13 |
27.9 |
1.08 |
28.4 |
0.96 |
1.02 |
|
|
Total |
61 |
Wt. Ave: |
0.99 |
|||||
Table 1 Summary of Data in S-L Orientation
|
Alloy |
Plate |
Crack |
No. |
KIc |
KIv |
KIv/KIc |
||
|
Thickness |
Orient. |
Tests |
Ave. |
Std Dev |
Ave. |
Std Dev |
||
|
7475-T351 |
1.75" |
L-T |
44 |
50.5 |
3.41 |
61.1 |
4.52 |
1.21 |
|
2.00" |
L-T |
22 |
53.7 |
2.35 |
67.0 |
3.02 |
1.25 |
|
|
2.25" |
L-T |
5 |
53.3 |
3.75 |
67.7 |
5.24 |
1.27 |
|
|
2.50" |
L-T |
7 |
54.3 |
0.89 |
68.7 |
1.81 |
1.27 |
|
|
3.00" |
L-T |
19 |
52.9 |
2.47 |
65.1 |
4.35 |
1.23 |
|
|
Total |
97 |
Wt. Ave: |
1.23 |
|||||
|
2124-T851 |
3.00" |
L-T |
5 |
29.7 |
0.64 |
32.0 |
1.70 |
1.08 |
|
6.00" |
L-T |
3 |
25.1 |
0.12 |
24.9 |
2.26 |
0.99 |
|
|
7050-T7451 |
5.70" |
L-T |
39 |
32.6 |
1.39 |
35.6 |
1.54 |
1.09 |
|
7150-T651 |
0.75" |
L-T |
16 |
28.3 |
1.41 |
38.0 |
2.63 |
1.34 |
|
7050-T73651 |
2.25" |
L-T |
3 |
39.4 |
1.44 |
37.5 |
6.70 |
0.95 |
|
3.50" |
L-T |
3 |
40.7 |
0.90 |
43.0 |
2.70 |
1.06 |
|
|
4.00" |
L-T |
9 |
37.8 |
1.97 |
46.2 |
1.43 |
1.22 |
|
|
6.00" |
L-T |
15 |
32.3 |
1.32 |
34.7 |
1.61 |
1.08 |
|
|
Total |
30 |
Wt. Ave: |
1.11 |
|||||
Table 2 Summary of Data in L-T Orientation
|
Alloy |
Plate |
Crack |
No. |
KIc |
KIv |
KIv/KIc |
||
|
Thickness |
Orient. |
Tests |
Ave. |
Std Dev |
Ave. |
Std Dev |
||
|
7475-T351 |
2.00" |
T-L |
5 |
38.9 |
0.77 |
47.0 |
1.51 |
1.21 |
|
3.00" |
T-L |
20 |
39.2 |
1.87 |
43.5 |
1.88 |
1.11 |
|
|
2124-T851 |
3.00" |
T-L |
5 |
25.1 |
0.81 |
26.1 |
0.98 |
1.04 |
|
6.00" |
T-L |
3 |
21.8 |
0.82 |
22.6 |
0.80 |
1.04 |
|
|
7050-T73651 |
2.25" |
T-L |
3 |
33.2 |
1.60 |
34.5 |
2.60 |
1.04 |
|
3.50" |
T-L |
4 |
30.1 |
0.90 |
31.5 |
0.98 |
1.05 |
|
|
4.00" |
T-L |
10 |
29.0 |
1.06 |
31.1 |
1.38 |
1.07 |
|
|
6.00" |
T-L |
14 |
28.2 |
1.05 |
29.3 |
0.89 |
1.04 |
|
|
Total |
64 |
Wt. Ave: |
1.08 |
|||||
Table 3 Summary of Data in T-L Orientation
Alcoa Data - Unpublished
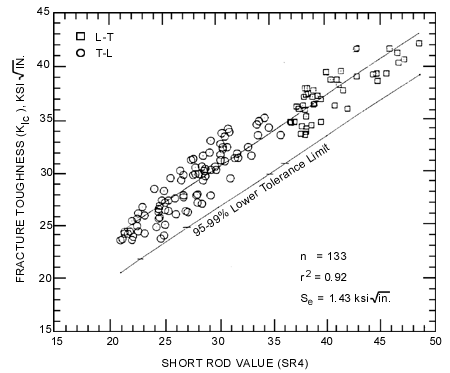
Alcoa has done substantial testing to compare KIv to KIc values for a number of aluminum alloys. The data provided to DCI corporation includes plots of 400 data pairs. Two of these plots have been reproduced with permission in this Technical Note, with material identification information removed. The data in the plot in Figure 1 is from an extrusion alloy, with both L-T and T-L data included. The data reproduced in Figure 2 is from a second extrusion alloy, with only L-T data included.
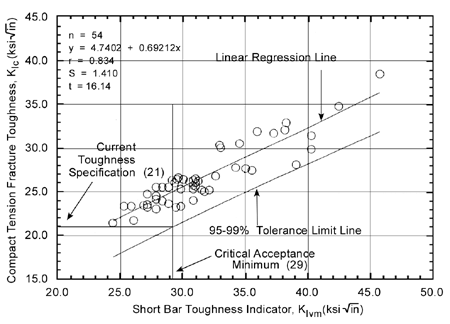
Figure 1
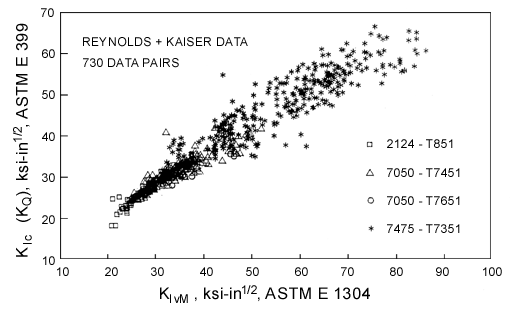
This data was published in a report titled, "Use of the Chevron-Notched Short bar Test to Guarantee Fracture Toughness for Lot Release in Aluminum Alloys," by J. W. Bray. Data in this report includes a total of 730 data pairs of KIvM and KIc values. The report is a compilation of data collected both by Reynolds and by Kaiser Aluminum. Data comes from four alloys in plate form and includes a variety of plate thicknesses and crack orientations.
Figure 4 plots all data in the report with KIc as a function of KIvM. This includes data pairs where the KIc value is actually invalid, and therefore the KQ value is plotted. The values are not separated by crack orientation, alloy, or plate thickness. The effect of high non-homogeneity ratios can be seen as the general trend of a curve fitting the data would become a little more flat at higher toughness values.
KIc (KQ) vs. KIvM
ALL ALLOYS, DIR'Ns, PLATE THICKNESS
Summary
In summary, several important points are worth emphasizing:
- Both KIv (E 1304) and KIc (E 399) are ASTM-acceptable values for the plane-strain fracture toughness of a material. In cases where LEFM assumptions are met, they produce equivalent values. When the two values are not equal, ASTM makes no judgment as to the relative accuracy of the two values. (Technical Note 507 discusses cases in which KIv may be a more realistic value of plane-strain fracture toughness than KIc.)
- In the case of lot release testing of aluminum alloys, E 1304 offers substantial savings in fracture toughness testing costs. Existing specifications for minimum values of fracture toughness for lot release are generally based on KIc. The data in this Technical Note support the ASTM standard statement that correlation between KIc and KIv must be determined for each material. In aluminum alloy plate material this correlation is a function of alloy, as well as test specimen orientation, location and size.
- Understanding the non-homogeneous nature of plane-strain fracture toughness in an aluminum plate can help significantly in understanding differences between KIc and KIv in the same plate.
- Substantial data has already been collected that can be used as a basis for developing correlations between KIv and KIc for materials of interest.